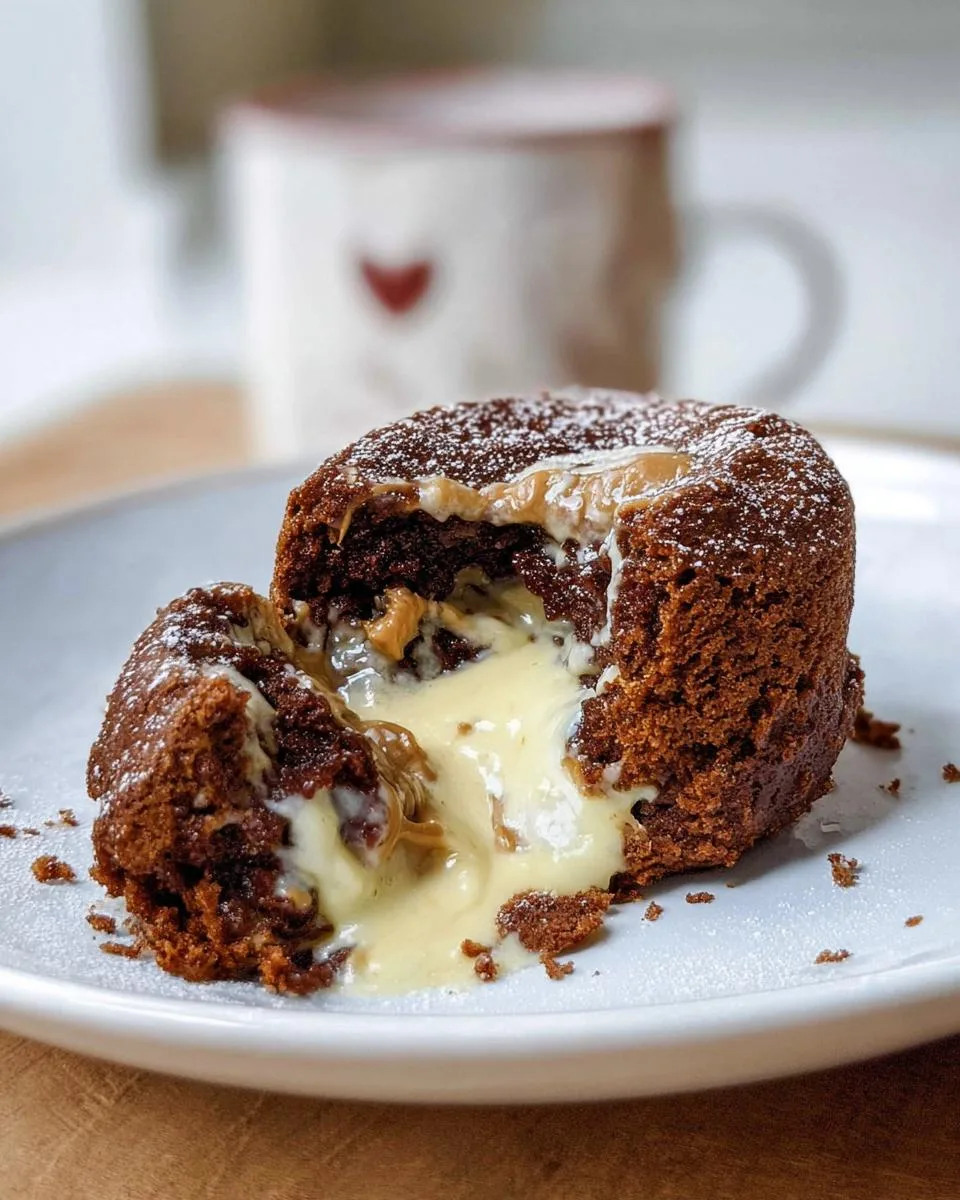
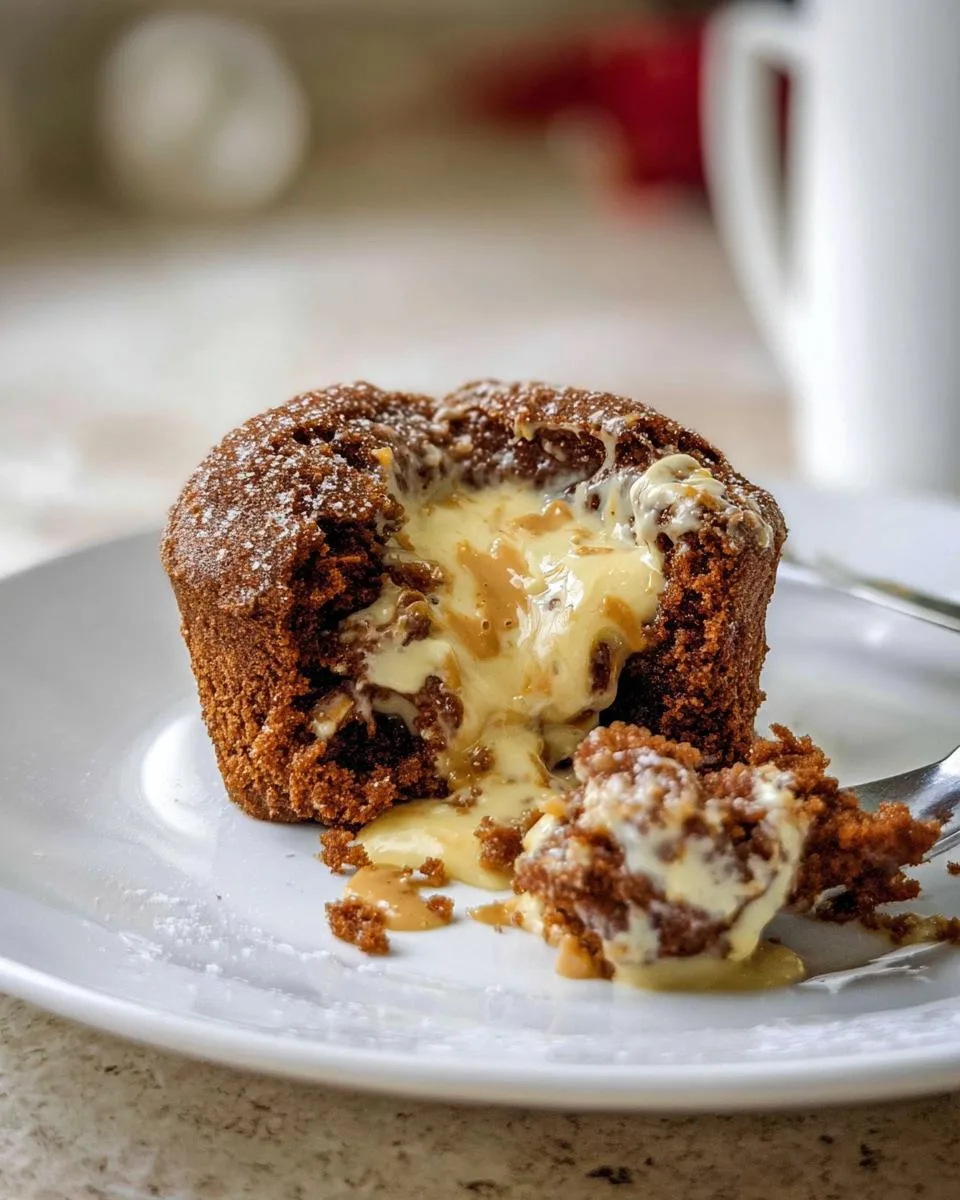
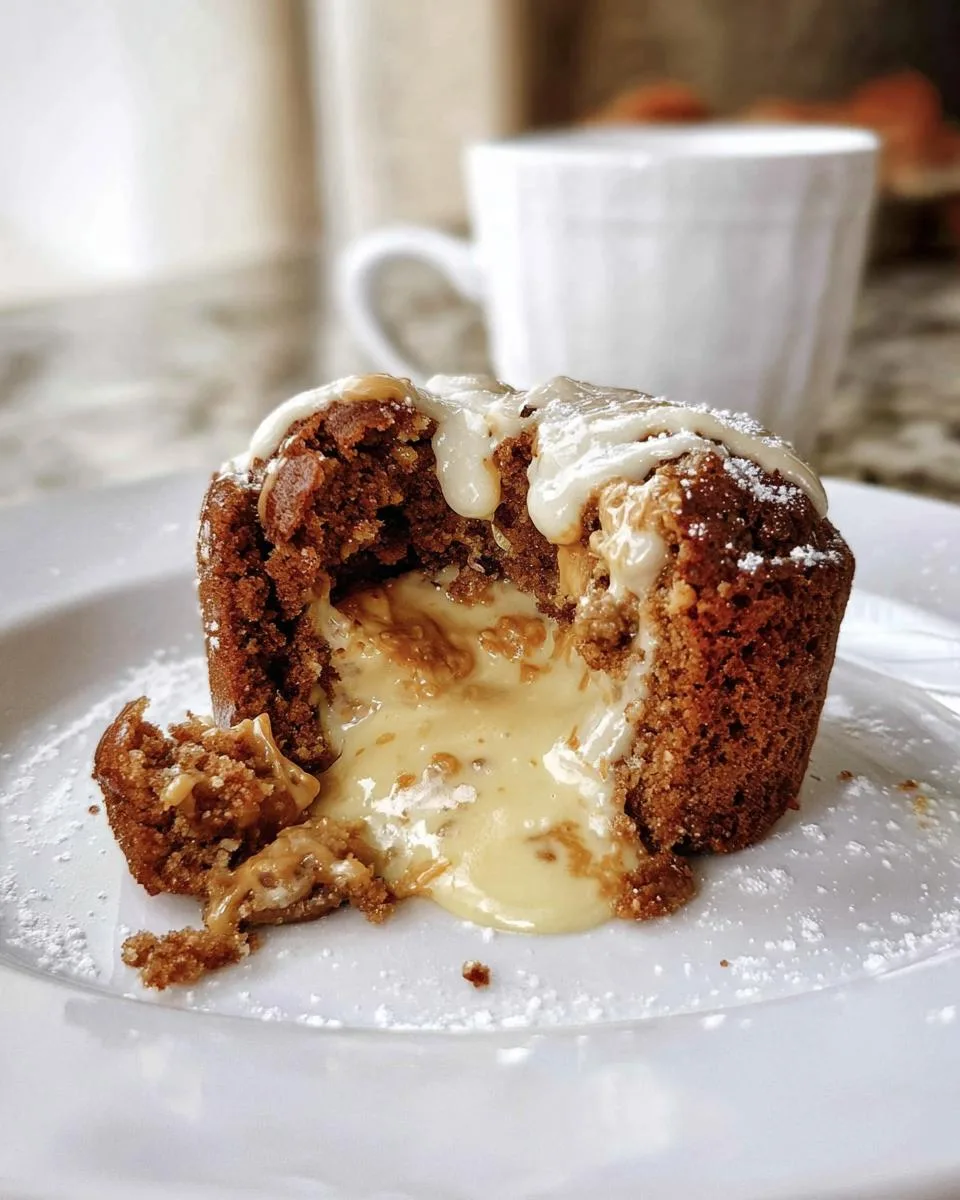
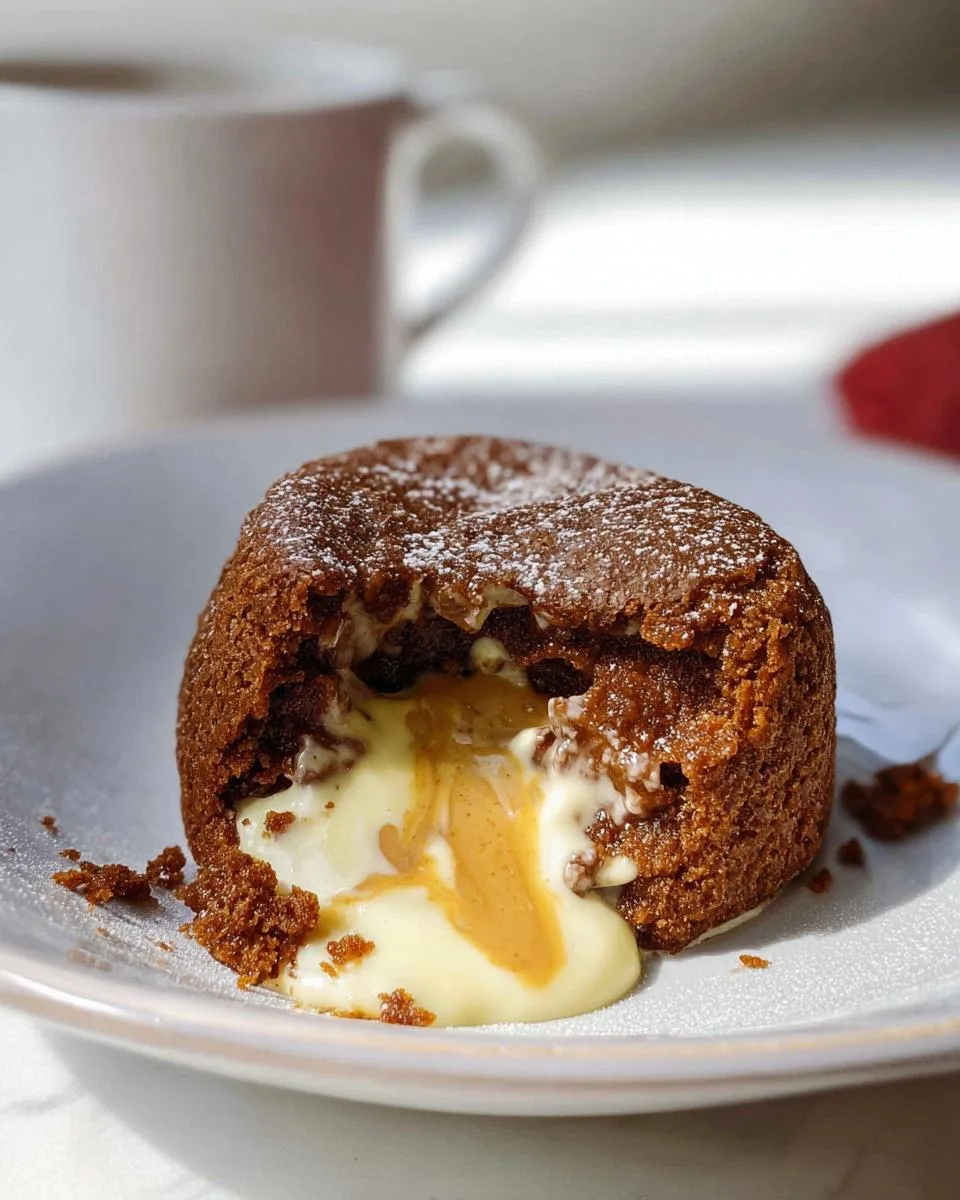
Ever have one of those nights where a sweet tooth hits hard, but turning on the oven feels impossible? I live for those moments because they call for a White Chocolate Lava Mug Cake. This is my secret weapon for a decadent, gooey dessert in under five minutes, using just my microwave and a favorite mug.
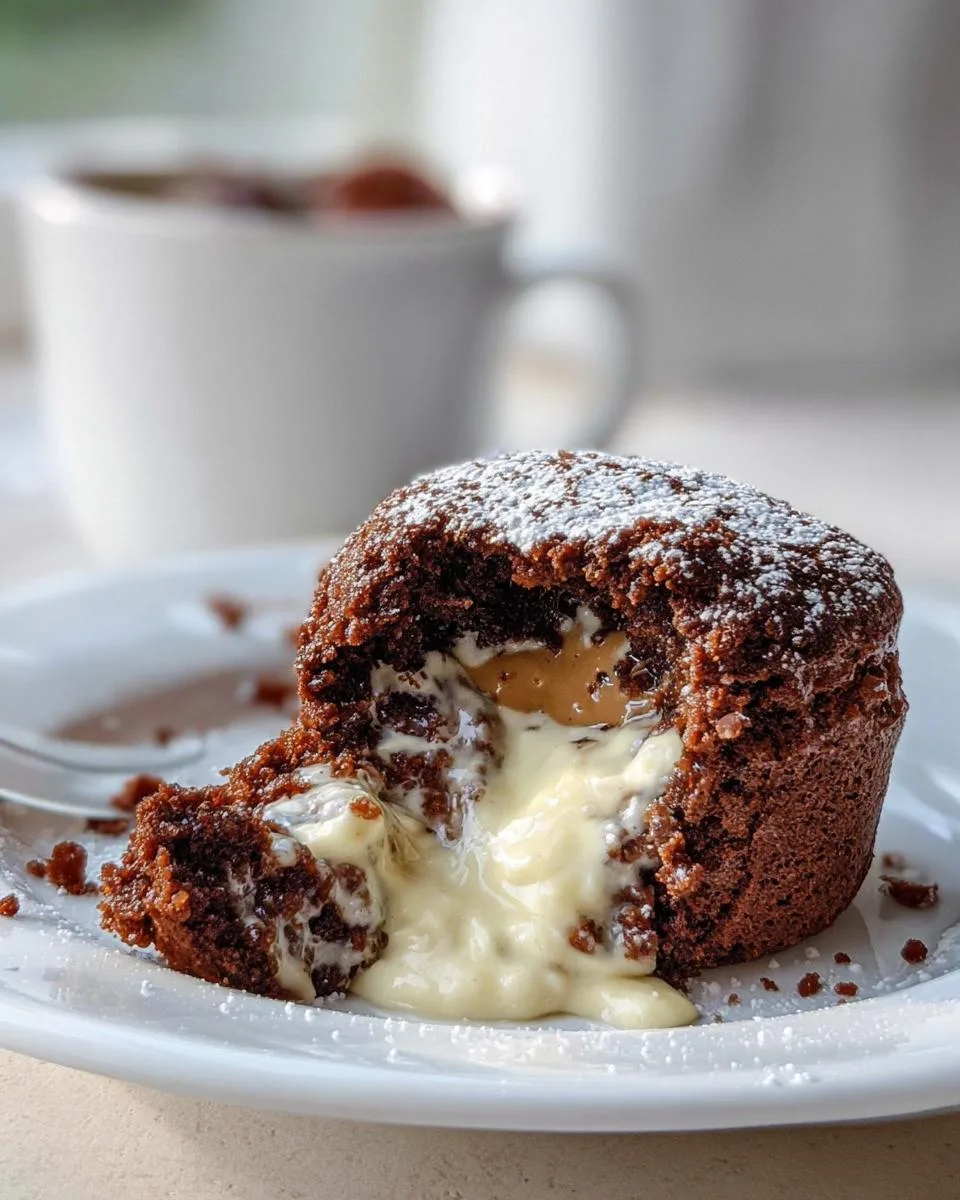
The secret to a perfect lava mug cake isn’t complicated, it’s about a simple trick with peanut butter and chocolate chips. I’ve made this more times than I can count after long days, and that warm, molten center never fails to feel like a hug. It’s a personal dessert that’s both luxurious and incredibly easy.
First, let’s walk through the recipe. Here’s everything you need to know to make your own quick and comforting white chocolate lava mug cake.
Table of Contents
Why You’ll Love This White Chocolate Lava Mug Cake
This recipe is my ultimate kitchen shortcut for instant joy. Here is exactly why it works so well.
- Unmatched Speed and Convenience: From pantry to spoon in under five minutes. There is no oven to preheat and no fancy equipment. Your microwave does all the work.
- Irresistible Molten Center: The magic happens when peanut butter meets white chocolate chips in the middle. The microwave heats this filling faster than the cake batter around it, creating that perfect, oozy lava flow everyone craves.
- Perfect Texture Balance: A quick, gentle stir keeps the batter tender. This soft cake forms a delicious pocket around the rich, gooey core. It is the ideal contrast in every bite.
- Customizable and Fun: This is a personal dessert made in your favorite mug. It is perfect for a solo treat or for making a few for the family. Let everyone pick their own add-ins.
It is more than a quick dessert. It is a guaranteed moment of pure, warm comfort.
Ingredients You’ll Need
This simple recipe uses pantry staples to create a luxurious treat. Here is what you need.
- 1/4 cup all-purpose flour
- 2 tablespoons granulated sugar
- 1/4 teaspoon baking powder
- 1/8 teaspoon salt
Ingredient Notes: That tiny bit of baking powder is non-negotiable. It gives our mug cake its lift in the fast microwave heat. Do not skip the salt. It is the secret that makes the white chocolate taste sweeter and more balanced.
- 1/4 cup milk (any type, dairy or non-dairy)
- 1 tablespoon vegetable oil (or canola, or any neutral oil)
- 1/2 teaspoon vanilla extract
Ingredient Notes: Milk gives the cake its moisture. I use vegetable oil because it stays liquid and creates a rich texture. Butter can sometimes get greasy in the microwave. Vanilla is your flavor booster. It makes everything taste more homemade.
- 2 tablespoons white chocolate chips, divided
- 1 tablespoon creamy peanut butter
Ingredient Notes: Spend a little extra on good white chocolate chips if you can. They melt into a smoother, creamier lava. The peanut butter is the glue for our molten center. For a nut-free cake, swap it for sunflower seed butter or a thick spoonful of raspberry jam.
See? Nothing fancy. With these few ingredients ready, you are moments away from your dessert.
How to Make White Chocolate Lava Mug Cake
Making this mug cake is a simple, four-minute process. The key is in the layering and watching your microwave. Follow these steps for that perfect, oozy center every single time.
Step 1: Prepare Your Mug
Grab a standard 10-ounce ceramic mug. Use your finger or a paper towel to lightly grease the inside with a tiny bit of oil or butter. This quick step is your insurance policy. It prevents the cake from sticking horribly to the sides. If your mug is much smaller, the batter might overflow. If it is much larger, the cake might not cook up nice and tall. A 10-ounce mug is the sweet spot.
Step 2: Mix the Dry Batter Base
Get out a small bowl. Add the flour, sugar, baking powder, and salt. Now, take a fork or a small whisk and give these dry ingredients a good mix. Do not just stir. Whisking them ensures the baking powder is evenly distributed. This is what gives our quick mug cake its lift and fluffy texture. A few seconds of whisking makes a big difference.
Step 3: Create the Wet Batter
Pour the milk, vegetable oil, and vanilla extract right into the bowl with your dry mix. Use a spoon to stir everything together. Your goal is a smooth batter with no dry flour patches. Here is the crucial tip. The moment the batter looks combined, stop stirring. Overmixing makes the gluten in the flour tough. We want a tender cake, not a chewy one. A few tiny lumps are perfectly fine.
Step 4: Layer the Batter and Lava Center
This is where the magic happens. Spoon about two-thirds of your batter into the greased mug. In a separate tiny dish, like a ramekin or a bottle cap, mix the peanut butter with one tablespoon of the white chocolate chips.
Now, dollop this sticky peanut butter mixture right into the center of the batter in your mug. Take the remaining batter and spoon it gently over the top, sealing the filling inside. Finish by sprinkling the last tablespoon of white chocolate chips on top.
This layering traps the filling. In the microwave, the dense peanut butter and chocolate center heats up and melts, creating that incredible molten lava pocket.
Step 5: Microwave and Rest
Place your mug in the microwave. Cook it on high power for 60 seconds. Do not walk away. When the timer beeps, look at the cake. The edges should look set and dry. The very center might still look a bit soft and shiny. If the top looks completely liquid, add 10 more seconds.
Check again. Microwave power varies a lot. Starting at 60 seconds prevents a dry, overcooked cake. Once it looks done, let it sit on the counter for 1 to 2 minutes. This rest is non-negotiable. It lets the cake finish setting up and cools the molten center just enough so it is safely gooey, not scalding hot. Then, dig in.
Pro Tips for the Best White Chocolate Lava Mug Cake
After making this recipe countless times, I have gathered a few secrets that take it from good to absolutely perfect. These simple tips ensure a flawless, gooey cake every single time.
- Use a Scale for Accuracy: For the most consistent results, weigh your flour. Use 30 grams instead of the 1/4 cup measure. Scooping flour with a cup can pack it down, leading to a dry, dense cake. A quick weigh guarantees the perfect tender texture.
- Quality Chocolate Matters: Not all white chocolate chips are created equal. Splurge a little on a brand with real cocoa butter. Higher-quality chips melt into a creamy, smooth river of lava instead of a grainy paste. It makes all the difference in the center.
- The Mug Matters: A standard 10-ounce ceramic mug is your best friend here. Avoid anything with metallic paint or trim, as it can spark in the microwave. The right size ensures the batter cooks evenly and rises up nicely around the filling.
- Watch, Don’t Guess: Do not set the timer and walk away. Stand by the microwave after the first 60 seconds. The cake goes from perfectly soft to dry and rubbery in mere seconds. You want the top to look mostly set with a slightly soft, shiny spot in the very center.
- The Rest is Key: Letting the mug cake cool for 1-2 minutes is not just for safety. This brief pause allows the structure to firm up slightly and the molten center to thicken to that ideal, spoonable consistency. It is the final step to dessert perfection.
Common Mistakes to Avoid
We have all been there. A quick dessert turns into a chewy hockey puck or a sticky mess. Do not worry. These are the most common mug cake slip-ups and exactly how to fix them. Knowing what to watch for is your best tool.
- Overmixing the Batter: WHY: We get excited and stir too hard for too long. HOW: Stir the wet and dry ingredients together just until the flour disappears. A few small lumps in the batter are your friend. They promise a tender cake, not a tough one.
- Skipping the Mug Prep: WHY: It seems like one extra, unnecessary step. HOW: Take five seconds to grease the mug with oil or butter. This simple act guarantees your cake will not fuse to the ceramic. It makes cleanup a breeze and lets you slide the cake onto a plate if you want.
- Overcooking in the Microwave: WHY: We assume it needs more time if the center looks wet. HOW: Always start with 60 seconds. The top should look mostly set, but the very center can still look a bit soft and shiny. If it looks like soup, add 10 seconds. You want a soft center, not a solid one.
- Using Cold Ingredients: WHY: Milk straight from the fridge is convenient. HOW: If you can, use milk that is closer to room temperature. It blends into the batter much more smoothly. This helps the cake cook evenly from the microwave’s intense heat.
Delicious Variations
The best part about a mug cake is how easily you can make it your own. Once you master the basic white chocolate lava version, try one of these simple twists. Each one creates a whole new dessert experience from the same easy formula.
- Nut-Free Lava Cake: Swap the peanut butter for one tablespoon of sunflower seed butter. It has a similar creamy texture. For a fruity twist, use a thick raspberry jam. The jam will create a sweet, bright lava center that pairs beautifully with the white chocolate.
- Double Chocolate Version: Craving classic chocolate? Replace half of the white chocolate chips with semi-sweet chocolate chips. Use them in the filling and on top. You will get a rich, deep chocolate flavor with that same incredible gooey center.
- Citrus Zest Twist: Add one teaspoon of finely grated lemon or orange zest to your dry ingredients before adding the wet ones. The bright citrus flavor cuts through the sweetness of the white chocolate. It makes the whole cake taste fresh and special.
- Berry Burst: Gently fold four or five fresh raspberries into your batter right before you spoon it into the mug. The berries will soften as they cook. They add little pockets of tart, juicy flavor that burst in your mouth with every bite.
Do not be afraid to experiment. The base recipe is forgiving, so have fun mixing in your favorite flavors for a personal treat.
Serving Suggestions
This white chocolate lava mug cake is a complete joy all on its own. But if you want to turn your quick treat into a special occasion, here are my favorite ways to serve it. Each idea fits a different mood and moment.
- Solo Indulgence: This is my go-to after a long day. Just grab a spoon and enjoy it warm, straight from the mug. The cozy, personal comfort is exactly what you need for a quiet weeknight treat.
- Dress It Up: Want to impress? Add a dollop of fresh whipped cream or a light dusting of powdered sugar right on top. It looks beautiful and adds a touch of elegance for a simple date night at home.
- Ice Cream Pairing: For the ultimate dessert, serve your warm mug cake with a scoop of vanilla ice cream on the side. The hot, gooey cake and the cold, creamy ice cream create a perfect flavor and temperature contrast that is absolutely magical.
- For Sharing: This recipe is easy to double or triple. Make a few mug cakes and enjoy them with friends over coffee. It is a simple, social dessert that feels special without any fuss. Everyone gets their own warm, personal cake.
No matter how you serve it, the best part is that first spoonful into the molten center. Enjoy that moment.
FAQs About White Chocolate Lava Mug Cake
Can I make this mug cake nut-free?
Yes, you absolutely can. Simply swap the peanut butter for one tablespoon of sunflower seed butter or a thick fruit jam like raspberry. The texture of the lava center will be a little different, but it will still be wonderfully gooey and delicious.
Why did my mug cake turn out dry or rubbery?
This usually happens from overcooking or overmixing. Always start with just 60 seconds in the microwave and only add time if the top looks completely wet. Also, stir your batter just until the flour disappears to keep the cake tender, not tough.
Can I use dark or milk chocolate instead?
Absolutely. Feel free to substitute the white chocolate chips with an equal amount of dark, semi-sweet, or milk chocolate chips. The peanut butter filling pairs wonderfully with any chocolate for a different flavor twist.
What are the nutrition facts for this mug cake?
Using the ingredients listed, one full mug cake is approximately 410 calories. Remember, the exact count can vary based on the specific brands of milk, peanut butter, and chocolate chips you choose to use.
Can I bake this in an oven instead?
I do not recommend it. Mug cakes rely on the microwave’s intense, rapid heat to cook the outside quickly while leaving the center molten. Baking in an oven requires a different time and temperature, which changes the texture and often eliminates the signature lava flow.
Your Quick White Chocolate Lava Mug Cake is Ready
And just like that, your five-minute luxury is ready. You have a warm, tender cake with a heart of sweet, gooey white chocolate lava. This recipe proves that a decadent dessert does not need to be complicated or time-consuming. It is all about simple ingredients and one clever trick.
I would love to hear how your white chocolate lava mug cake turned out. Did you stick with the classic or try a fun variation? Tell me all about it in the comments below. For more easy, family-friendly treats that deliver big flavor without the fuss, follow along with me on Pinterest. Now, grab your spoon and dive into that perfect, molten center. You have earned it.
Print
White Chocolate Lava Mug Cake
- Total Time: 4.5 minutes
- Yield: 1 serving 1x
- Diet: Vegetarian
Description
A quick and gooey microwave mug cake with a molten white chocolate and peanut butter center.
Ingredients
- 1/4 cup all-purpose flour
- 2 tablespoons granulated sugar
- 1/4 teaspoon baking powder
- 1/8 teaspoon salt
- 1/4 cup milk
- 1 tablespoon vegetable oil
- 1/2 teaspoon vanilla extract
- 2 tablespoons white chocolate chips, divided
- 1 tablespoon creamy peanut butter (or almond butter for nut-free)
Instructions
- Lightly grease the inside of a 10-ounce mug or ramekin.
- In a small bowl, whisk together the flour, sugar, baking powder, and salt.
- Pour in the milk, vegetable oil, and vanilla extract. Stir until just combined and a smooth batter forms. Do not overmix.
- Spoon about two-thirds of the batter into the prepared mug.
- In a separate tiny bowl, combine the peanut butter with 1 tablespoon of the white chocolate chips. Stir well.
- Dollop this peanut butter mixture into the center of the batter in the mug.
- Gently spoon the remaining batter over the peanut butter mixture, ensuring it is fully covered. Sprinkle the remaining 1 tablespoon of white chocolate chips on top.
- Microwave on high for 60 to 90 seconds, or until the edges are set and the center is still slightly soft. Start with 60 seconds and add 10-second increments if needed.
- Let the mug cake cool for 1-2 minutes before enjoying directly from the mug.
Notes
- Avoid overmixing the batter to ensure a tender cake.
- Microwave times can vary, so watch the cake closely after 60 seconds.
- Using good quality white chocolate chips will enhance the molten center.
- Serve warm with a dusting of powdered sugar or a dollop of whipped cream for an extra special treat.
- Prep Time: 3 minutes
- Cook Time: 1.5 minutes
- Category: Dessert
- Method: Microwave
- Cuisine: American
Nutrition
- Serving Size: 1 mug cake
- Calories: 410
- Sugar: 32g
- Sodium: 300mg
- Fat: 20g
- Saturated Fat: 6g
- Unsaturated Fat: 10g
- Trans Fat: 0g
- Carbohydrates: 50g
- Fiber: 1g
- Protein: 7g
- Cholesterol: 10mg
Keywords: mug cake, microwave dessert, white chocolate, peanut butter, quick dessert