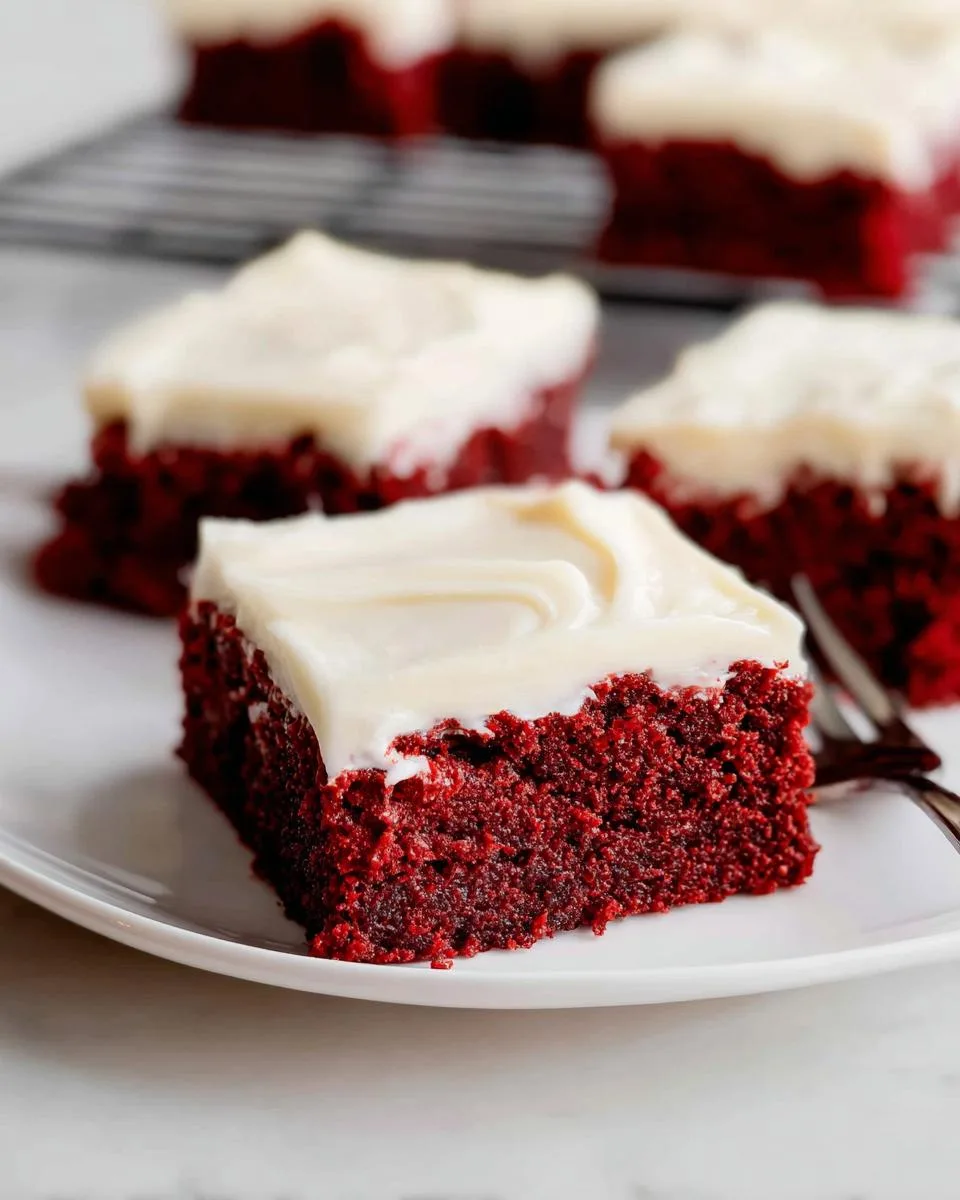
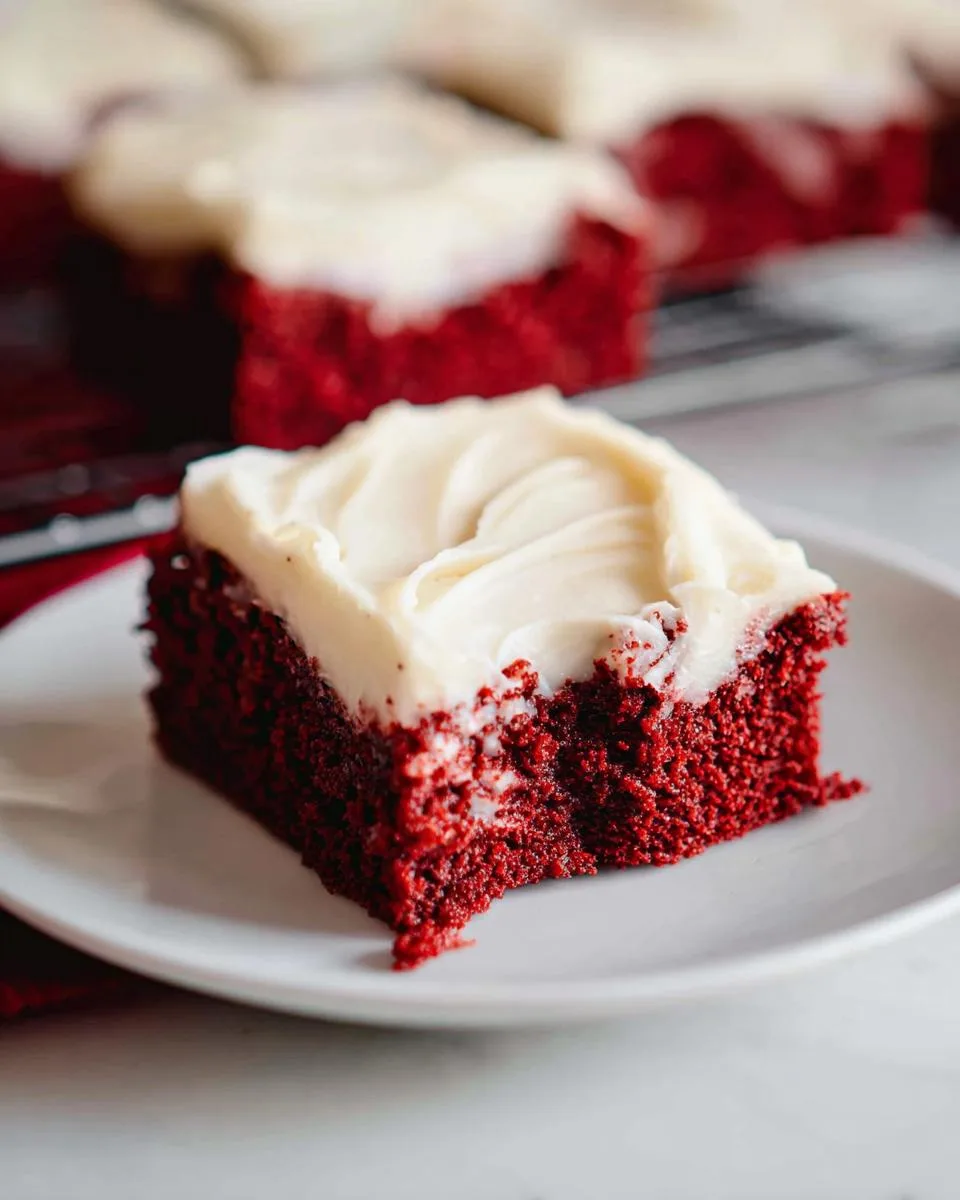
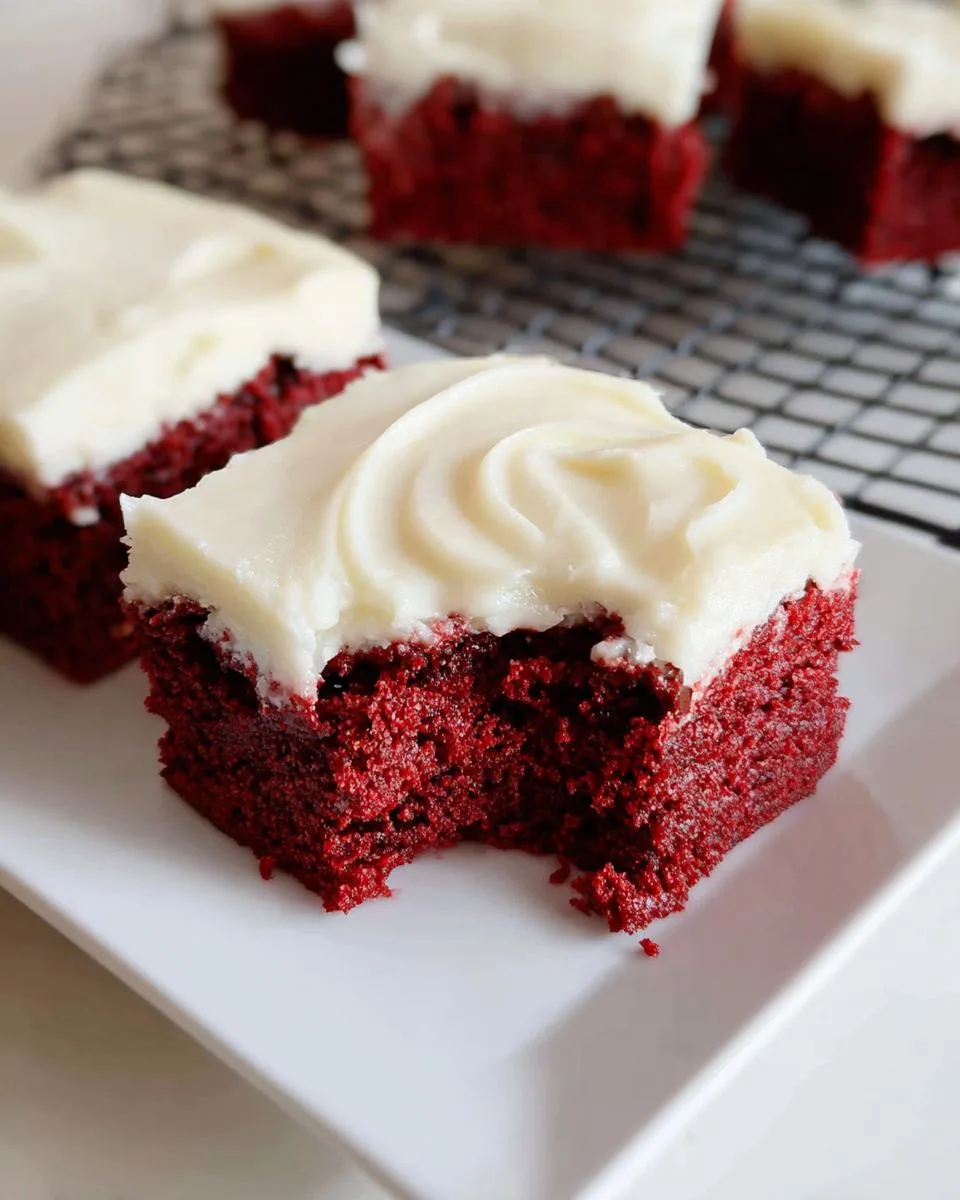
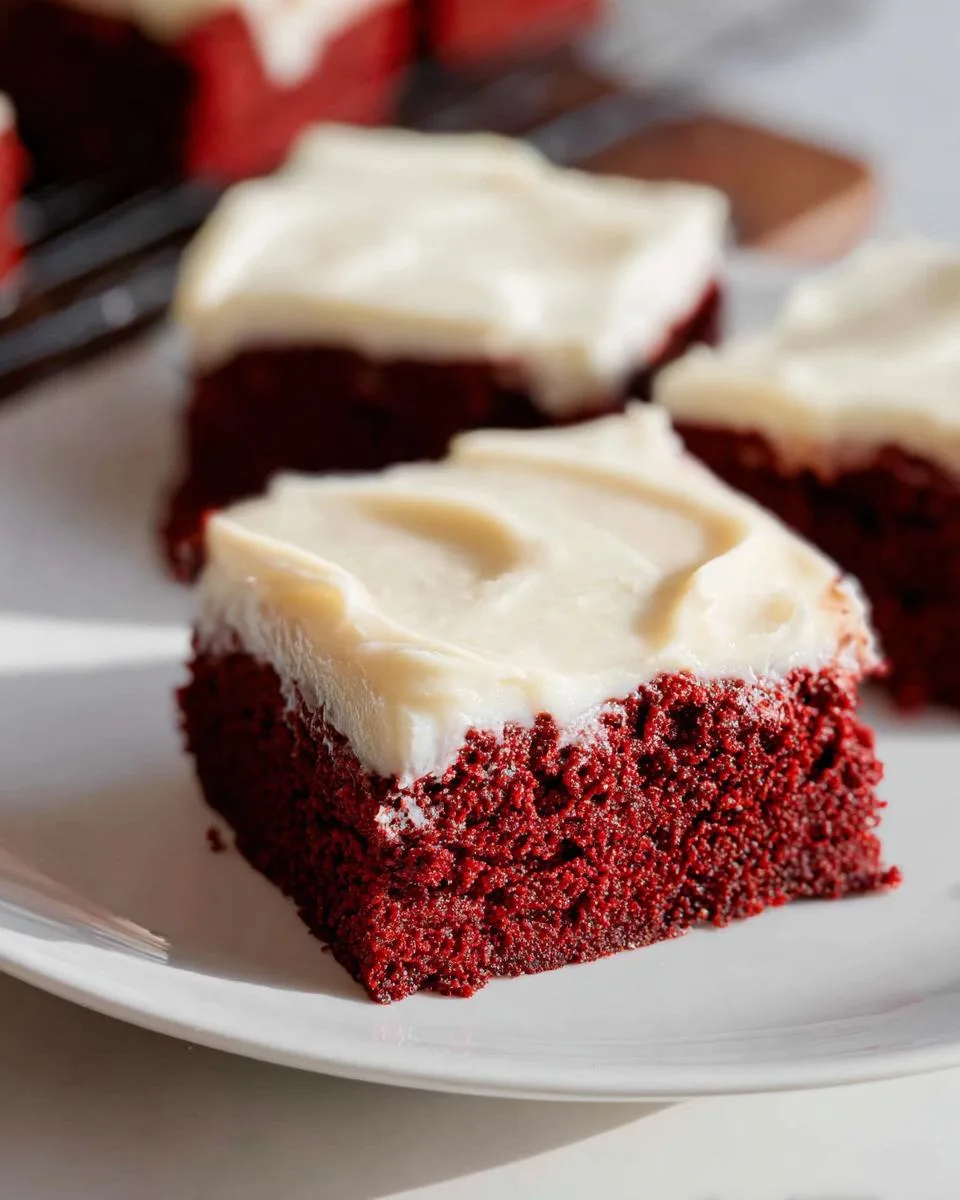
Have you ever wanted a dessert that looks like a million bucks but bakes up in one simple pan? These red velvet brownies are your answer. They combine a fudgy, rich chocolate base with a tangy cream cheese swirl for the perfect bite every time.
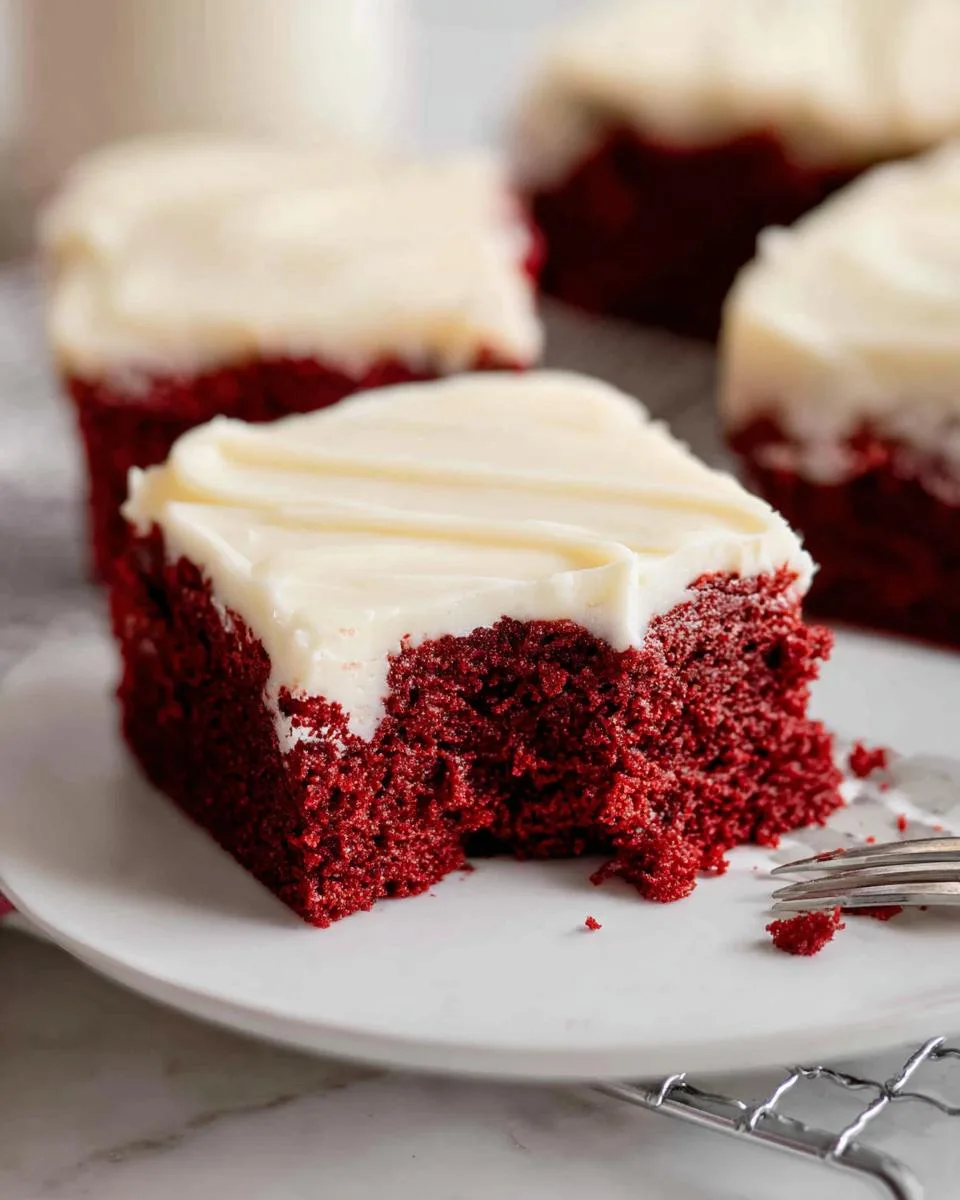
This recipe delivers that iconic red velvet flavor and stunning color without any fuss. I started making these for Valentine’s Day, and now my family requests them for every holiday, potluck, and “just because” Tuesday. The secret to amazing red velvet brownies isn’t complicated, it’s about nailing that fudgy texture and not skimping on the cream cheese.
First, let’s walk through the recipe. You’ll see how easy it is to create this showstopping treat in your own kitchen.
Table of Contents
Why You’ll Love These Red Velvet Brownies
Let me tell you exactly why this recipe is about to become your new favorite. It hits every note you want in a great dessert without any of the stress.
- Perfect Texture: These are the best red velvet brownies because they are wonderfully fudgy and dense. That rich crumb melts in your mouth and creates a dreamy contrast with the smooth, creamy frosting on top.
- Stunning Visual Appeal: That deep, vibrant red swirled with snowy white frosting is pure magic. You get a showstopping dessert that looks like it came from a fancy bakery.
- Balanced Flavor: We get the rich chocolate base just right. It pairs perfectly with the tangy cream cheese frosting so every bite is delicious without being too sweet.
- Beautiful Simplicity: This is an easy dessert recipe at its core. You mix the brownies in one bowl and the frosting in another. No complicated techniques or fancy equipment required.
- Total Versatility: I make these for Valentine’s Day and Christmas, but they’re just as perfect for a bake sale, a potluck, or a special weeknight treat when you need a little joy.
This recipe is a guaranteed win. It gives you impressive results with a process that feels completely doable, even on a busy day.
Ingredients You’ll Need
Gathering your ingredients is the first step to baking magic. This list is simple, and most items are likely already in your pantry. We will create two parts: the rich, fudgy brownie base and that irresistible tangy frosting.
- For the Red Velvet Brownies:
- 1/2 cup (1 stick) unsalted butter, melted: Melted butter gives us that dense, fudgy texture we love.
- 1 cup semi-sweet chocolate chips: Melting these with the butter creates our luxurious chocolate base.
- 1 cup granulated sugar: Sweetens the batter perfectly.
- 2 large eggs, at room temperature: Room-temperature eggs blend into the batter more smoothly for an even crumb.
- 1 teaspoon pure vanilla extract: A must for that warm, classic flavor.
- 1 cup all-purpose flour, spooned and leveled: Spoon the flour into your measuring cup and level it off. This prevents using too much flour, which can make brownies dry.
- 1 teaspoon baking powder: Gives our brownies just a little lift.
- 1/2 teaspoon fine salt: Balances and enhances all the sweet flavors.
- 1 ounce red gel food coloring (about 2 tbsp): This is key! Gel coloring gives a vibrant, bakery-style red without watering down your batter.
- For the Cream Cheese Frosting:
- 8 ounces full-fat cream cheese, softened: Full-fat is best for flavor and stability. Let it sit out until it’s soft to the touch for a lump-free frosting.
- 1/4 cup (1/2 stick) unsalted butter, softened: Softened butter whips up beautifully with the cream cheese.
- 1 teaspoon pure vanilla extract: Adds a subtle sweetness to the frosting.
- 2 cups powdered sugar, sifted: Sifting prevents lumps and makes your frosting silky smooth.
- 1 to 2 tablespoons milk or heavy cream: Start with one tablespoon to achieve a spreadable consistency. Add more only if needed.
A quick ingredient note: if you want to experiment, you can swap the chocolate chips for 1/4 cup of Dutch-process cocoa powder. It changes the flavor slightly, but it is still delicious. With everything on your counter, you are just minutes away from the best red velvet brownies.
How to Make Red Velvet Brownies
Ready to bake? This process is simple, but a few key steps make all the difference. Follow along, and you will have perfect, fudgy brownies with that gorgeous swirled top.
Step 1: Prep and Melt the Chocolate Base
First, get your oven heating to 350°F (175°C). This ensures it is ready when your batter is. Line your 8-inch square pan with parchment paper, letting some hang over the sides. This creates handles to lift the whole batch out later. Now, grab a microwave-safe bowl. Combine your melted butter and chocolate chips. Microwave them in 30-second bursts. Stir well after each burst until the mixture is completely smooth and glossy. Let this chocolate base cool for about 5 minutes. This prevents the eggs from cooking when you add them.
Step 2: Build the Brownie Batter
Whisk the granulated sugar into your warm chocolate mixture. It will look grainy at first, but keep whisking. Next, add your eggs one at a time. Whisk vigorously after each egg until the batter becomes thick, shiny, and smooth. Stir in the vanilla extract. In a separate small bowl, whisk together the flour, baking powder, and salt. Now, gently fold these dry ingredients into your wet batter. Use a spatula and fold just until you see no more dry flour streaks. Overmixing here makes cakey brownies, and we want fudgy.
Step 3: Add the Signature Color
This is the fun part. Add your red gel food coloring to the batter. I promise, gel is worth it for that deep, vibrant color. Gently fold it in with your spatula. Keep folding until the color is completely uniform and a brilliant, bold red. A few extra folds are fine, but stop once the color is even to avoid overworking the batter.
Step 4: Bake and Cool Completely
Pour your gorgeous red batter into the prepared pan. Spread it into an even layer. Slide the pan into your preheated oven. Bake for 20 to 25 minutes. Start checking at 20 minutes. The brownies are done when a toothpick poked into the center comes out with a few moist crumbs clinging to it. If it comes out totally clean, they are overbaked. Place the pan on a wire rack and let the brownies cool completely right in the pan. This is non-negotiable for perfect frosting.
Step 5: Make the Cream Cheese Frosting
While the brownies cool, make the frosting. In a medium bowl, use a hand mixer to beat the softened cream cheese and softened butter together. Beat them on medium speed until the mixture is creamy, smooth, and has no lumps. Beat in the vanilla extract and 1 tablespoon of milk. Now, with your mixer on low speed, gradually add the sifted powdered sugar. Once it is incorporated, beat on medium speed for a minute until the frosting is fluffy and thick. If it seems too stiff to spread, add more milk just one teaspoon at a time.
Step 6: Frost and Swirl
Once the brownies are fully cool to the touch, it is time. Spread the cream cheese frosting evenly over the entire surface. For that beautiful swirled look, use the tip of a knife or the back of a spoon. Gently drag it through the frosting in loose, figure-eight patterns. Let the frosted brownies sit for 10 to 15 minutes. This lets the frosting set a bit so you get super clean slices when you cut them.
Pro Tips for the Best Red Velvet Brownies
A few simple tricks will take your brownies from great to absolutely incredible. These are the little things I’ve learned after making this recipe dozens of times.
- Gel Coloring is Key: For that intense, bakery-style red velvet color, gel food coloring is non-negotiable. Liquid coloring can water down your batter and give you a pinkish hue. The gel packs in vibrant color without changing your batter’s perfect, thick consistency.
- Soft Dairy is a Must: Your cream cheese and butter need to be truly soft for the frosting. Leave them on the counter for a good hour. When you press them, your finger should leave a deep indent. This is the secret to a silky-smooth, lump-free frosting that spreads like a dream.
- Trust the Toothpick Test: Do not overbake. At 20 minutes, check them. The toothpick should have a few sticky, moist crumbs attached. If it comes out completely clean, the brownies are already overdone. They will continue to set as they cool, so pull them when they’re just right.
- Patience with Cooling: I know it is tempting, but you must let the brownies cool fully. Frosting warm brownies will melt the cream cheese into a messy, runny glaze. Wait until the pan feels cool to the touch for that beautiful, distinct layered look.
- Charlotte’s Slicing Secret: For picture-perfect squares, use a sharp knife. Dip it in very hot water, wipe it completely dry, and make your cut. The heat glides right through the frosting and fudgy layers. Wipe and reheat the knife between each cut for super clean edges every time.
Follow these tips, and you will have a stunning, professional-looking dessert that tastes even better than it looks.
Common Mistakes to Avoid
Even the best recipes can have a few pitfalls. Knowing what to watch for is the best way to guarantee perfect red velvet brownies every single time.
- Using Liquid Food Coloring: This is the most common slip. Liquid coloring adds too much moisture to your batter. It can make your brownies bake up oddly and will only give you a faint pink color, not that classic deep red. The fix is simple: use gel food coloring for intense, vibrant results without messing up your batter’s texture.
- Overmixing After Adding Flour: Once you add the flour mixture, your goal is to mix just until the dry streaks disappear. Overmixing at this stage develops the gluten in the flour. This leads to brownies that are cakey, tough, and chewy instead of tender and fudgy. Gently fold with a spatula and stop as soon as everything is combined.
- Frosting Warm Brownies: I know the wait is hard, but this is crucial. If the brownie base is even slightly warm, it will melt the cream cheese frosting on contact. You will end up with a runny, messy glaze instead of that beautiful, distinct white swirl. The fix is patience. Let the pan cool completely on a wire rack before you even think about the frosting.
- Not Softening the Dairy: If your cream cheese and butter are still cold from the fridge, they will not blend smoothly. You will be left with a lumpy, grainy frosting that is impossible to spread evenly. The solution is to plan ahead. Take your cream cheese and butter out about an hour before you need them, letting them soften truly at room temperature.
Don’t panic if you make one of these mistakes. We have all been there. Just keep these tips in mind for your next batch, and you will nail it.
Delicious Variations
Once you have mastered the classic version, have fun playing with it. These easy twists let you customize your red velvet brownies for any mood or occasion. My family loves when I switch it up.
- White Chocolate Chip: For a sweet, creamy contrast, fold 1/2 cup of white chocolate chips into your red batter just before pouring it into the pan. They create lovely little pockets of sweetness in every fudgy bite.
- Mocha Twist: Craving a deeper flavor? Add 1 teaspoon of instant espresso powder to your bowl of dry ingredients. It will not make your brownies taste like coffee. Instead, it enhances the rich chocolate notes beautifully.
- Baked-In Swirl: For a marbled effect, try this. Dollop spoonfuls of your cream cheese frosting directly onto the unbaked red batter in the pan. Use a knife to gently swirl it together. Bake as directed. You will get a stunning, swirled pattern baked right in.
- Mini Brownie Bites: Perfect for parties. Grease a mini muffin tin well. Scoop a heaping tablespoon of batter into each cup. Bake for only 12 to 15 minutes. Let them cool in the pan before frosting for adorable two-bite treats.
Do not be afraid to experiment. The best part of baking is making a recipe your own.
Serving Suggestions
These red velvet brownies are a star on their own, but a little presentation goes a long way. For the best texture, I love serving them slightly chilled. Just 30 minutes in the fridge firms up the fudgy layers and makes the frosting taste wonderfully refreshing.
Think about the occasion. For a cozy weeknight dessert, a cold glass of milk is the perfect partner. Want to impress guests? Place a warm brownie on a plate with a scoop of vanilla ice cream. The contrast is heavenly. A hot cup of coffee or black tea also balances the sweetness beautifully.
Their festive color makes them ideal for holidays. Bring a tray to a Christmas party or a Valentine’s Day dinner for instant cheers. They are always the first to disappear at a potluck. For a heartfelt gift, stack a few in a cute box lined with parchment paper. It is a homemade present that truly says you care.
FAQs About Red Velvet Brownies
Can I make these red velvet brownies without food coloring?
Yes, but they will be brown chocolate brownies. For a natural red color without dye, you can use 1/4 cup of beet powder. Please note, the color will be more of a deep pink or burgundy, not the classic vibrant red. The flavor will have a very subtle earthy note.
How do I store leftover brownies?
Because of the cream cheese frosting, you must store them in the refrigerator. Place them in an airtight container. They will stay fresh and delicious for up to 5 days. Let them sit at room temperature for 10 minutes before serving for the best texture.
Can I freeze red velvet brownies?
Absolutely. For best results, freeze the unfrosted, cooled brownie slab. Wrap it tightly in plastic wrap and then foil. It will keep for up to 3 months. Thaw overnight in the fridge, then frost. You can freeze frosted brownies in a single layer, but the frosting may become slightly grainy when thawed.
Why are my brownies cakey and not fudgy?
This is almost always due to two things: overmixing or overbaking. Once you add the flour, mix only until the streaks disappear. Overmixing develops gluten. Also, pull the brownies from the oven when the toothpick has moist crumbs, not when it comes out completely clean.
What is the calorie count for one brownie?
Nutritional values change based on the exact brands you use. A typical serving from this recipe is roughly 350-400 calories. For the most accurate count for your batch, I recommend using an online nutrition calculator with your specific ingredient list.
Bake Your Batch of Red Velvet Brownies
There you have it. A stunning, delicious dessert that is surprisingly simple to make. These red velvet brownies deliver that perfect fudgy texture and tangy cream cheese swirl every time. They prove that a showstopping treat doesn’t require a whole day in the kitchen.
I hope you feel excited to bake them. I would absolutely love to hear how your batch turns out. Did your family go crazy for them? Did you try a fun variation? Tell me all about it in the comments below. For more easy, family-friendly baking ideas that never skimp on flavor, come follow along on Pinterest. Now, go preheat that oven. Your perfect red velvet brownies are waiting.
Print
Red Velvet Brownies
- Total Time: 40 minutes
- Yield: 9 servings 1x
- Diet: Vegetarian
Description
Indulge in the ultimate chocolate and cream cheese treat! These vibrant red velvet brownies are fudgy, rich, and topped with a decadent swirl of tangy cream cheese frosting. Perfect for holidays or anytime you need a showstopper dessert.
Ingredients
- 1/2 cup (1 stick) unsalted butter, melted
- 1 cup semi-sweet chocolate chips
- 1 cup granulated sugar
- 2 large eggs
- 1 teaspoon vanilla extract
- 1 cup all-purpose flour
- 1 teaspoon baking powder
- 1/2 teaspoon salt
- 1 ounce red food coloring (about 2 tablespoons gel or 1/4 cup liquid)
- 8 ounces cream cheese, softened
- 1/4 cup unsalted butter, softened
- 1 teaspoon vanilla extract
- 2 cups powdered sugar
- 1 to 2 tablespoons milk (as needed for frosting consistency)
Instructions
- Preheat your oven to 350°F. Line an 8-inch square baking dish with parchment paper or grease it well.
- Combine melted butter and chocolate chips in a microwave-safe bowl. Microwave in 30-second intervals, stirring between each, until smooth.
- Let the chocolate mixture cool for 5 minutes. Whisk in granulated sugar until combined.
- Add eggs one at a time, whisking after each addition. Stir in vanilla extract.
- Whisk flour, baking powder, and salt in a separate bowl. Gradually add to wet ingredients, stirring until just combined.
- Fold red food coloring into the batter until uniform.
- Pour batter into prepared baking dish and spread evenly.
- Bake for 20-25 minutes until a toothpick inserted comes out with moist crumbs. Cool completely in pan.
- Beat softened cream cheese and softened butter together until smooth and creamy.
- Add vanilla extract and 1 tablespoon milk. Beat until combined.
- Gradually beat in powdered sugar until thick and smooth. Add more milk if needed for consistency.
- Spread cream cheese frosting over cooled brownies. Swirl with a knife for effect.
- Allow frosting to set slightly before slicing into squares.
Notes
- Use gel food coloring for more intense red color.
- Ensure cream cheese and butter are at room temperature for smooth frosting.
- Do not overbake the brownies; they should be slightly fudgy in the center.
- Prep Time: 15 minutes
- Cook Time: 25 minutes
- Category: Dessert
- Method: Baking
- Cuisine: American
Nutrition
- Serving Size: 1 brownie
- Calories: 420
- Sugar: 38g
- Sodium: 180mg
- Fat: 22g
- Saturated Fat: 13g
- Unsaturated Fat: 7g
- Trans Fat: 0g
- Carbohydrates: 52g
- Fiber: 1g
- Protein: 4g
- Cholesterol: 75mg
Keywords: red velvet brownies, cream cheese frosting, dessert, chocolate, baking