Ever find yourself staring into the fridge, desperate for a healthy breakfast that doesn’t feel like a chore? I’ve been there too many times. That’s exactly why I created these Granola Cups. They are the perfect, portable solution for busy mornings.
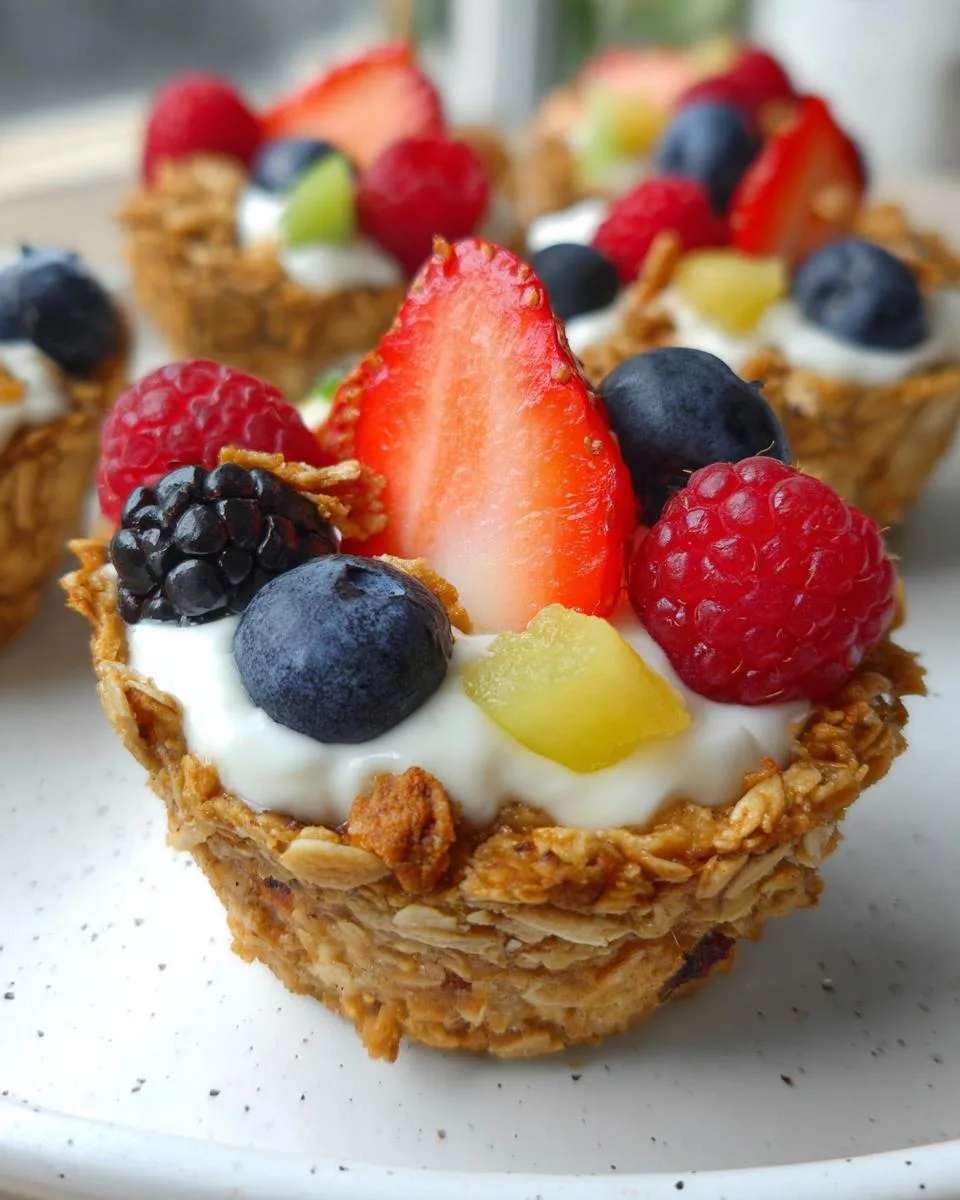
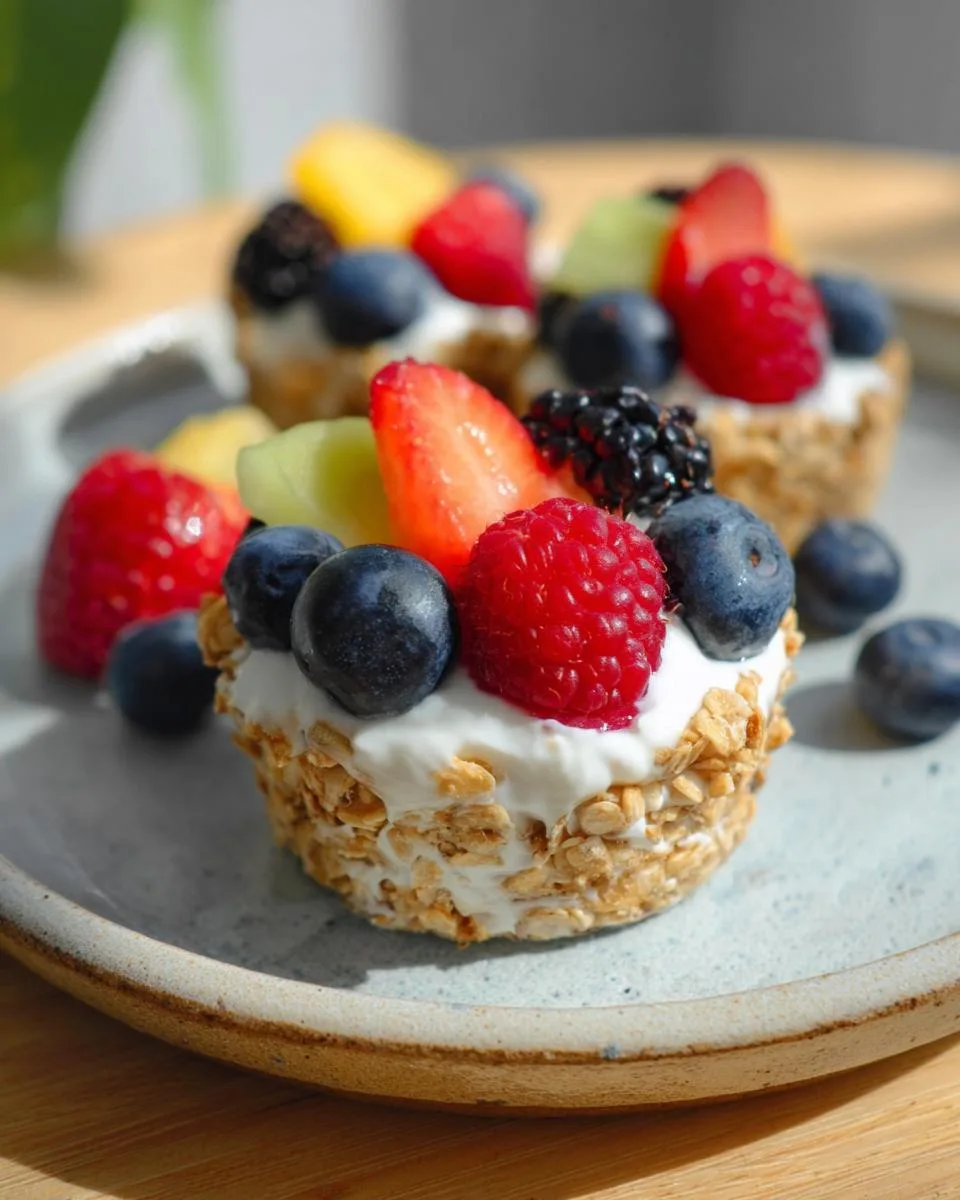
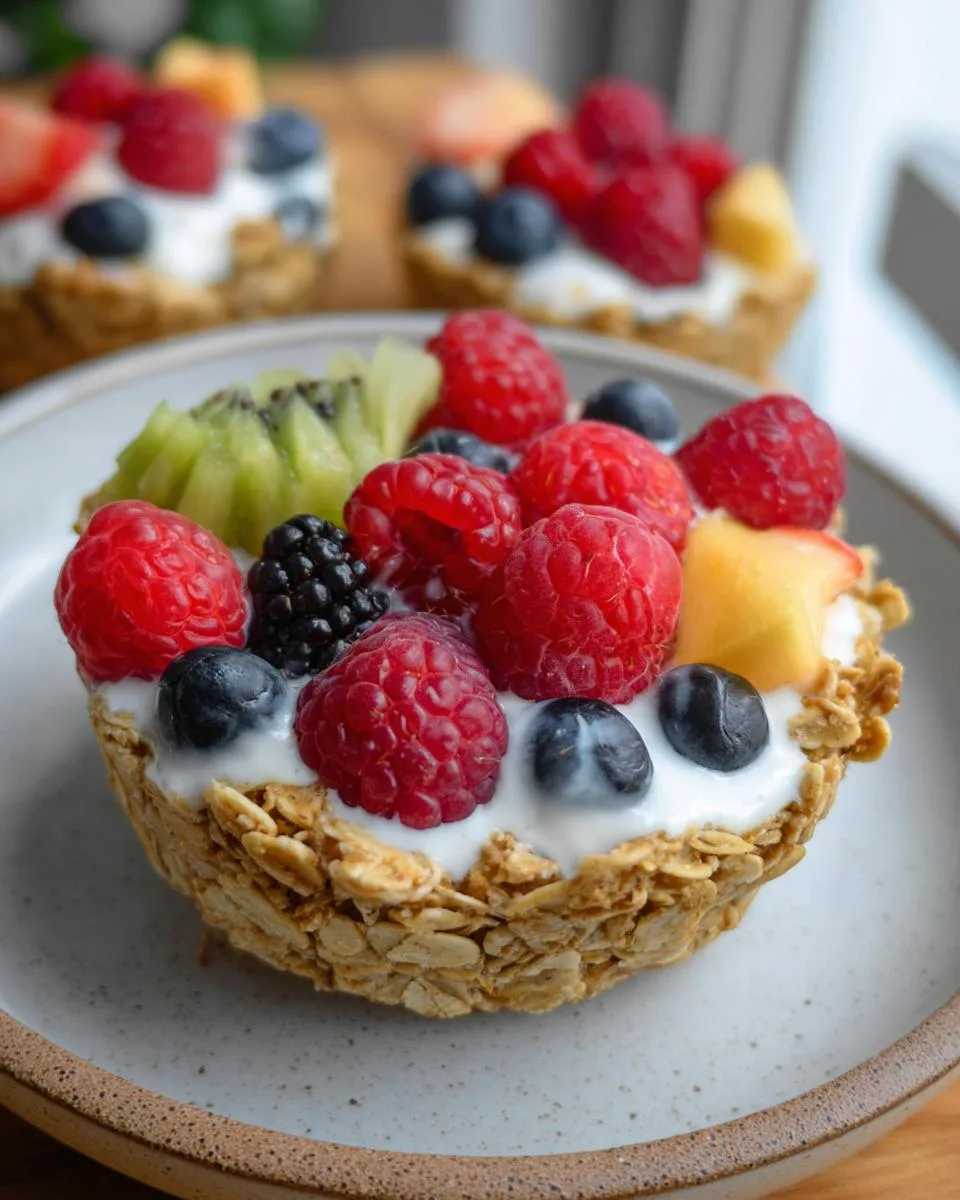
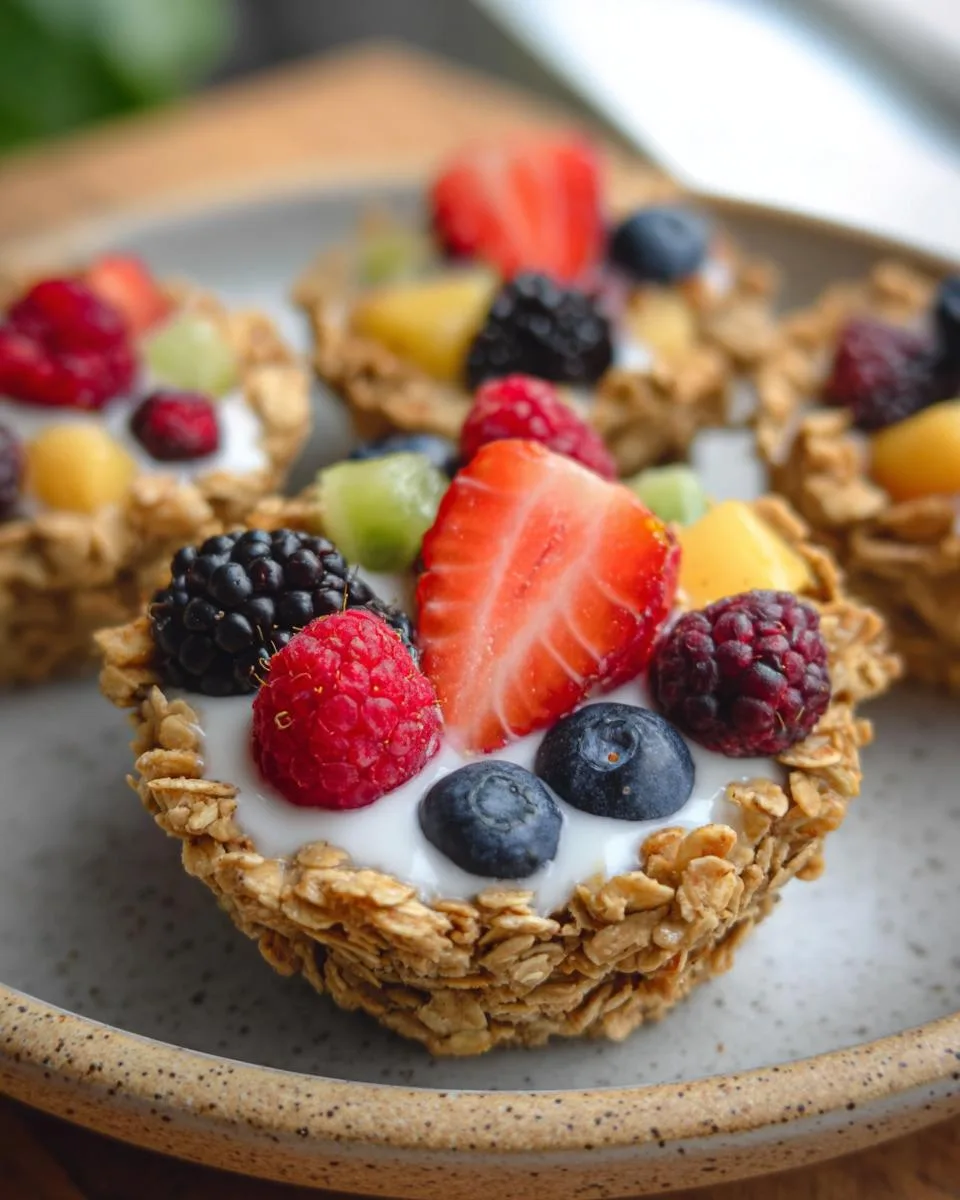
Imagine a crisp, baked oat shell filled with cool, creamy yogurt and a rainbow of fresh berries. These little cups are a joy to make and even better to eat. They feel special but come together with just a few simple ingredients from your pantry.
In my house, they disappear faster than I can make them. The secret to perfect Granola Cups isn’t complicated, it’s about a good, firm press and a little patience while they cool. First, let’s walk through the recipe.
Table of Contents
Why You’ll Love These Granola Cups
If you’re tired of soggy cereal or boring toast, this recipe is your new morning hero. Here’s why these Granola Cups have become a staple in my kitchen and will likely become one in yours too.
- Perfectly Portable: They are designed for real life. You can make them, fill them, and grab one as you run out the door. No spills, no mess.
- Simple Pantry Staples: You probably have oats, peanut butter, and maple syrup in your cupboard right now. That’s the magic. No fancy shopping trip required.
- Totally Customizable: Use whatever yogurt you love and any fruit you have. My kids love strawberries, but I often use leftover blueberries or a sliced banana.
- Naturally Friendly: With certified gluten-free oats and dairy-free yogurt, these cups easily fit gluten-free and vegan diets without any special effort.
- Sturdy and Satisfying: The bake-and-cool method creates a cup that’s crunchy enough to hold its shape but not too hard. It gives you that perfect textural contrast with the creamy filling.
They are the ultimate combination of easy, adaptable, and downright delicious. Let’s gather your ingredients.
Ingredients You’ll Need
This recipe uses simple pantry staples to build a sturdy, sweet oat cup and a fresh, creamy filling. You can easily find everything you need.
- For the Granola Cups:
- 2 cups old-fashioned rolled oats: These are the backbone of the cups. They give that classic granola texture. Do not use instant oats, as they won’t hold their shape. If you need gluten-free granola cups, make sure your oats are certified gluten-free.
- ½ cup creamy peanut butter: This acts as the glue. For easiest mixing, use a natural peanut butter that’s a bit runny. Pack it firmly into the measuring cup.
- ½ cup maple syrup: Real maple syrup is my favorite here. It binds everything together and adds a rich, caramel-like flavor. Honey works great too.
- 1 teaspoon pure vanilla extract: A little splash of vanilla makes the flavor pop.
- ¼ teaspoon salt: This tiny bit of salt balances all the sweetness perfectly.
- Coconut oil, for greasing: A very light coating on your muffin tin is the secret to getting your granola cups out cleanly.
- For the Filling:
- 1 cup dairy-free yogurt: I love coconut or almond yogurt here. Using chilled yogurt helps keep the cups crisp. You can use regular yogurt too.
- Assorted fresh berries: Strawberries, blueberries, raspberries, or blackberries are perfect. The key is to use dry fruit. Pat your berries gently with a paper towel to prevent sogginess.
- Sliced kiwi or mango: These add a lovely tropical twist. Any fruit you love works.
A quick substitution tip: If peanut butter isn’t your thing, almond butter or sunflower seed butter are excellent swaps. Now, let’s turn these ingredients into your new favorite snack.
How to Make Granola Cups
Making these cups is a fun, hands-on process. Follow these simple steps for perfect results every time.
Step 1: Preheat and Prepare Your Pan
Start by turning your oven on to 350°F (175°C). This gives it time to reach the right temperature while you mix. Grab a standard muffin tin. Lightly grease six of the cups with coconut oil. I use my fingers or a paper towel to make sure every bit of the surface is coated. This small step is your insurance policy for easy removal later.
Step 2: Mix the Granola Cup Base
In a large mixing bowl, combine the rolled oats, peanut butter, maple syrup, vanilla extract, and salt. Stir everything together with a sturdy spoon until it starts to come together.
Then, I always switch to using my hands. Squeeze and mix the dough until every oat is coated and the mixture feels uniformly sticky. There should be no dry spots. This sticky texture is what holds the cups together.
Step 3: Shape the Granola Cups
Divide the sticky oat mixture evenly among your six greased muffin cups. Now, use your fingers or the back of a small spoon to press the mixture. Press it firmly into the bottom and up the sides of each cup.
You want to create a clear, deep hollow in the center for your filling. The more firmly you press, the sturdier your baked Granola Cups will be. This is the most important part of shaping.
Step 4: Bake and Cool Completely
Place the muffin tin in your preheated oven. Bake for 20 minutes. You’ll know they’re done when the edges look lightly golden and the cups feel set to the touch.
Now, this is the critical part. Let the muffin tin sit on your counter for at least 30 minutes. Do not try to remove the cups yet. They need this full cooling time to firm up and become crisp. Patience here makes perfect cups.
Step 5: Remove and Fill Your Granola Cups
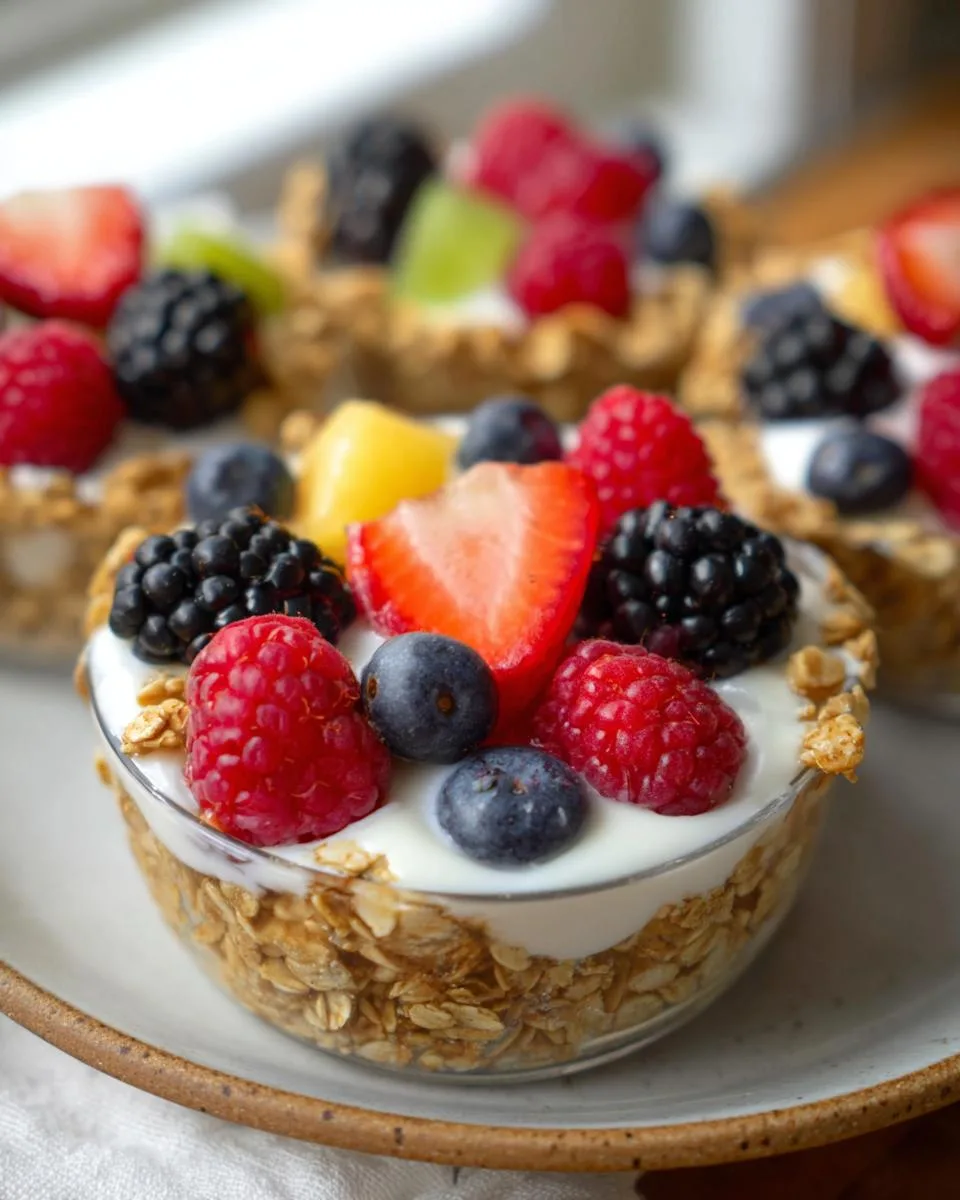
After cooling, take a thin butter knife or small spatula. Gently run it around the edge of each cup to loosen it. Then, carefully lift each Granola Cup out of the tin. Fill the hollows first with your chilled yogurt. Then, pile on your fresh, dry fruit. Serve them right away for the best crisp texture, or chill them for a cool, refreshing treat.
Pro Tips for the Best Granola Cups
After making dozens of batches, I’ve learned a few tricks that guarantee perfect Granola Cups every single time. These little details make all the difference.
- Press Like You Mean It: When shaping the cups, press the oat mixture firmly into every corner of the muffin cup. A strong, even press creates a solid shell. If you press lightly, your cups will be crumbly.
- Cooling is Crucial: Let the baked cups cool completely in the muffin tin for at least 30 minutes. This is the most important step. The cups are soft when hot, but as they cool, they firm up and become crisp. Do not rush this.
- Choose Runny Nut Butter: For the easiest mixing and best binding, use a natural nut butter that’s oily and runny. If your peanut butter is thick and cold, warm it slightly in the microwave for 10 seconds to make it easier to mix.
- Fill at the Last Minute: To keep your Granola Cups crisp, fill them with yogurt and fruit just before you plan to eat them. If you fill them hours ahead, the moisture can soften the shell.
- Charlotte’s Secret for Presentation: Chop larger berries like strawberries into small, bite-sized pieces. This looks neat and makes eating easier. For extra color, use a mix of different berries.
Following these simple tips will give you sturdy, delicious Granola Cups that hold their shape beautifully.
Common Mistakes to Avoid
A few small slip-ups can lead to crumbly or soggy Granola Cups. Don’t panic if you’ve made one of these mistakes. Here’s how to fix them and get perfect results.
- Not Pressing the Mixture Firmly: This happens when you’re rushing to get them into the oven. If you don’t press the oats hard into every part of the muffin cup, you won’t form a solid shell. The fix is simple. Take your time and press the mixture firmly with your fingers or a spoon.
- Removing Cups Too Early: The cups are soft and fragile when they are still hot from the oven. If you try to take them out right away, they will break. Let them cool completely in the muffin tin for at least 30 minutes. They will firm up and become sturdy.
- Using Thick or Cold Nut Butter: A stiff, cold nut butter makes mixing very difficult and can leave dry spots in your dough. To fix this, warm your nut butter slightly in the microwave for 10 seconds. Or, just use a natural, oily style from the jar for a sticky, easy-to-work dough.
- Adding Wet Fruit Toppings: Juicy, wet berries can make your crisp cups soft. Before adding your fruit, pat your berries dry with a paper towel. Or, choose toppings like banana slices or mango that are less juicy.
Delicious Variations
The beauty of these Granola Cups is how easily you can change them. One simple recipe can become a dozen different snacks. Here are my favorite ways to play with the flavors.
- Chocolate Granola Cups: Mix 2 tablespoons of cocoa powder into your oat mixture before shaping. It creates a rich, chocolatey shell perfect for a dessert-like treat.
- Nut-Free Granola Cups: For allergies or preferences, swap the peanut butter for sunflower seed butter. It binds just as well and has a lovely, mild flavor.
- Different Fillings: Don’t limit yourself to yogurt. Try Greek yogurt for extra protein, a dollop of whipped cream for dessert, or a thick chia pudding for a vegan option.
- Seasonal Toppings: Match your fruit to the season. Use diced apple with a sprinkle of cinnamon in fall. Try sweet peach slices in summer.
- Add-In Granola Cups: For extra texture, mix ¼ cup of mini chocolate chips or chopped nuts like almonds or pecans right into the base before baking.
Feel free to mix and match these ideas. Let your pantry and your taste buds guide you.
Serving Suggestions
These Granola Cups are wonderfully versatile. They shine as a complete meal on their own, but they also pair beautifully with other foods. Here are my favorite ways to serve them for different occasions.
- Busy Weekday Breakfast: Grab one filled cup as your complete, on-the-go breakfast. It’s perfectly balanced and keeps you satisfied until lunch.
- Picnic or Hike Snack: Pack unfilled cups and a small container of yogurt and fruit in your bag. Assemble them at your destination for a fresh, portable treat that travels without spills.
- Healthy Dessert Option: Serve them at a casual dinner party. Fill them with a dollop of whipped cream and berries for a light, sweet ending that feels special.
- Brunch Side Dish: Pair two cups with a green smoothie or a scrambled egg for a more substantial, complete brunch spread.
- After-School Snack: Have a batch of unfilled cups ready in the pantry. Let your kids fill their own with yogurt and fruit for a fun, healthy snack they can make themselves.
Whether you serve them solo or as part of a meal, these cups always feel like a little bit of joy.
FAQs About Granola Cups
Can I make these Granola Cups ahead?
Yes, they are perfect for making ahead. Bake and cool the cups completely. Store the unfilled cups in an airtight container at room temperature for up to 3 days. Fill them with yogurt and fruit just before you’re ready to eat to keep the shells crisp.
What if I don’t have a muffin tin?
You can shape the mixture into freeform cups on a parchment-lined baking sheet. They won’t be as uniform, but they will still taste great. A standard muffin tin gives you the best shape and consistent results every time.
Are Granola Cups gluten-free?
Yes, they can be. Just make sure to use old-fashioned rolled oats that are certified gluten-free. Regular oats are often processed in facilities with wheat, so checking the package label is important for a gluten-free diet.
How many calories are in a Granola Cup?
One filled Granola Cup is approximately 300 calories. This is an estimate. The exact nutrition can vary based on the specific brands of yogurt, nut butter, and maple syrup you use in your recipe.
Can I freeze Granola Cups?
Absolutely. Freeze the baked and cooled cups (unfilled) in a single layer on a tray, then transfer to a freezer bag. They will keep for up to 1 month. Thaw at room temperature for about 15 minutes before filling and serving.
Make Your Granola Cups Today
You have everything you need to make these delightful Granola Cups. They are your answer to hectic mornings and hungry afternoons. A little mixing, a firm press, and a patient wait for them to cool transforms pantry staples into a handheld treat. I promise they are worth every simple step.
I love seeing your creations. Tell me in the comments what your favorite filling combination was. Did your kids go for strawberries, or did you try a chocolate version? For more easy, family-friendly recipes that turn everyday ingredients into something special, come follow me on Pinterest. Let’s keep making food that feels good.
Print
Granola Cups
- Total Time: 40 minutes
- Yield: 6 servings 1x
- Diet: Vegan
Description
Delightful baked granola cups filled with creamy yogurt and vibrant fresh fruit, perfect for breakfast or a healthy snack.
Ingredients
- 2 cups old-fashioned rolled oats
- ½ cup creamy peanut butter
- ½ cup maple syrup
- 1 teaspoon vanilla extract
- ¼ teaspoon salt
- Coconut oil, for greasing
- 1 cup dairy-free yogurt (such as coconut or almond yogurt)
- Assorted fresh berries (strawberries, blueberries, raspberries, blackberries)
- Sliced kiwi or mango
Instructions
- Preheat your oven to 350°F (175°C). Lightly grease six cups of a standard muffin tin with coconut oil.
- Combine the rolled oats, peanut butter, and maple syrup in a large bowl. Mix thoroughly until well combined.
- Divide the oat mixture evenly among the six prepared muffin cups.
- Press the mixture firmly into the bottom and up the sides of each muffin cup, creating a hollow center for the filling.
- Bake for 20 minutes, or until the edges are lightly golden and the cups have set.
- Allow the granola cups to cool completely in the muffin tin for at least 30 minutes.
- Loosen the edges of each granola cup with a thin spatula or butter knife.
- Remove the granola cups from the muffin tin. Fill the hollow centers with dairy-free yogurt and top with fresh fruit.
Notes
- Press the mixture very well into the muffin tin for firmer cups.
- Almond butter or sunflower seed butter are good alternatives to peanut butter.
- Store unfilled, cooled granola cups in an airtight container at room temperature for up to 3 days.
- Prep Time: 20 minutes
- Cook Time: 20 minutes
- Category: Breakfast
- Method: Baking
- Cuisine: American
Nutrition
- Serving Size: 1 granola cup
- Calories: 303 kcal
Keywords: granola cups, vegan breakfast, healthy snack, baked granola, fruit and yogurt