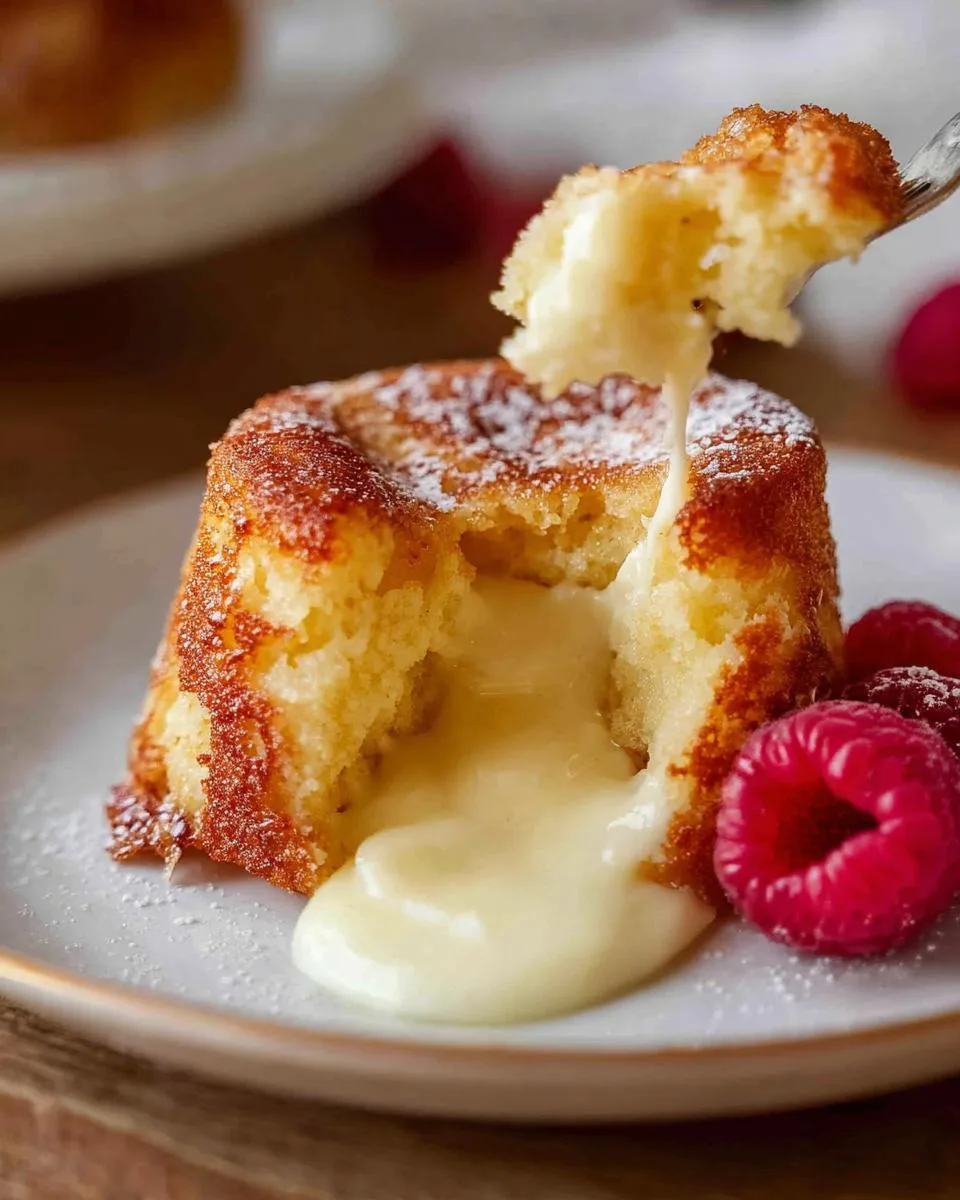
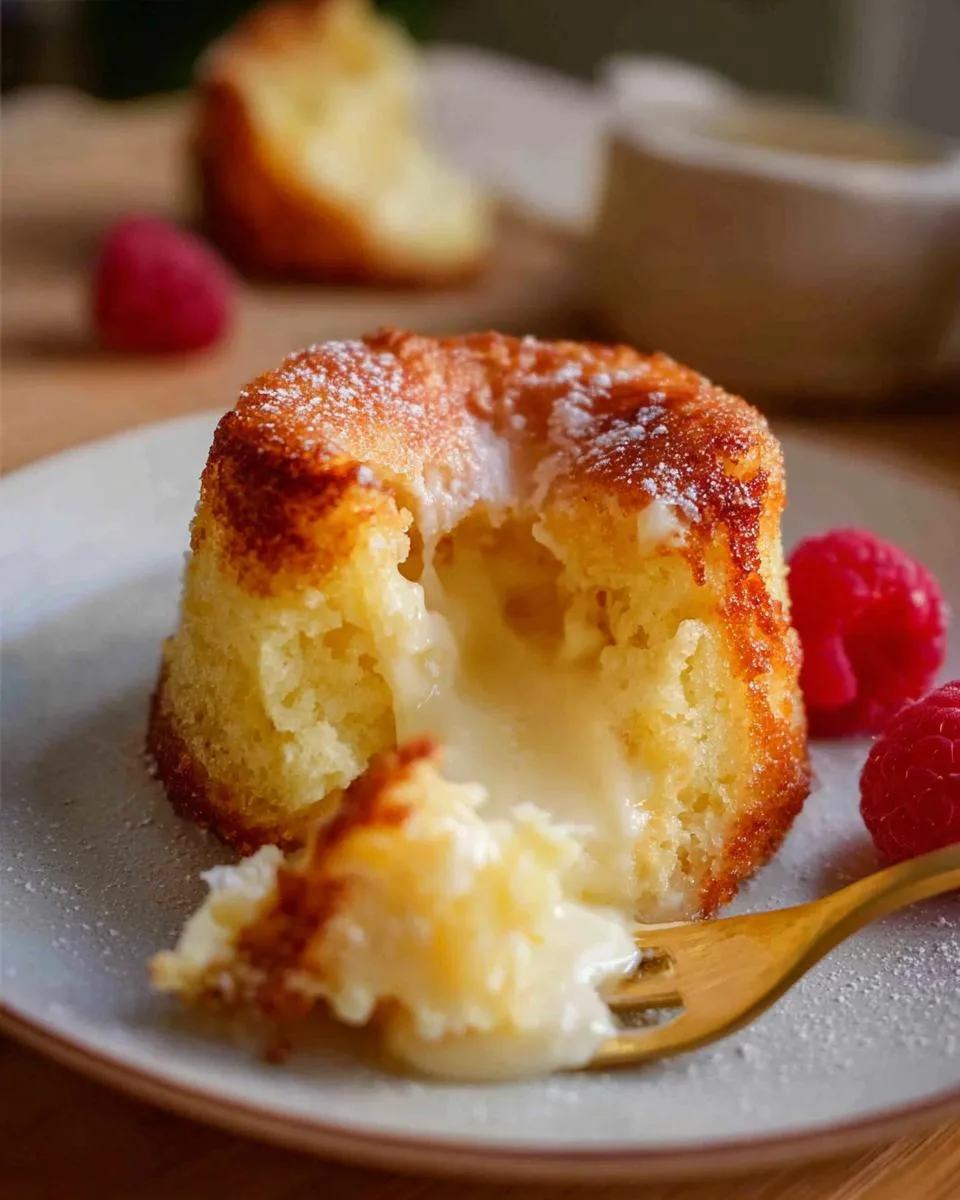
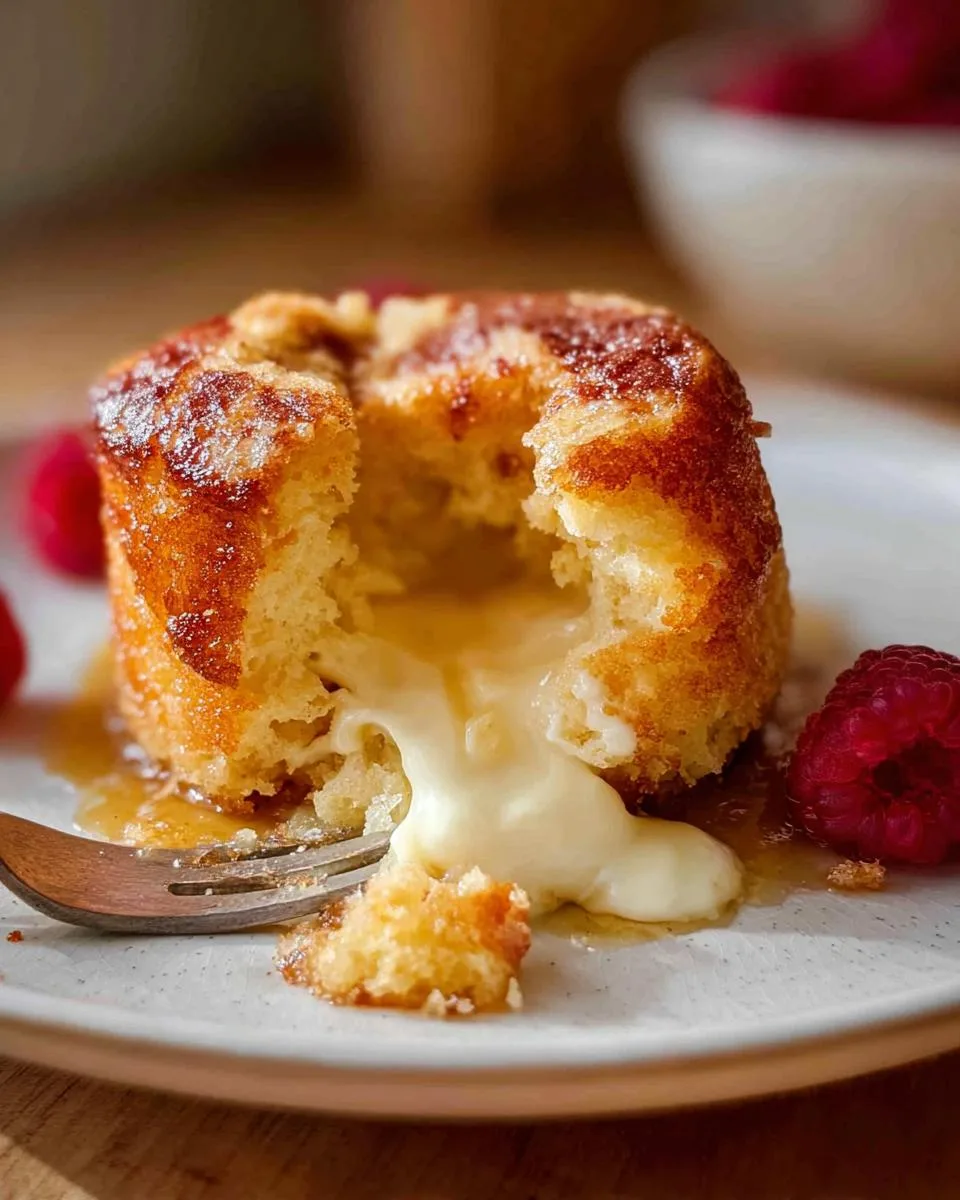
I remember the first time I truly mastered a white chocolate lava cake. I held my breath, slid a spoon into the side, and watched a river of warm, creamy white chocolate flow out onto the plate. It felt like discovering a delicious secret. That moment of pure magic is what I want for you. A perfect white chocolate lava cake seems fancy, but I promise it’s a surprisingly simple dessert to make at home.
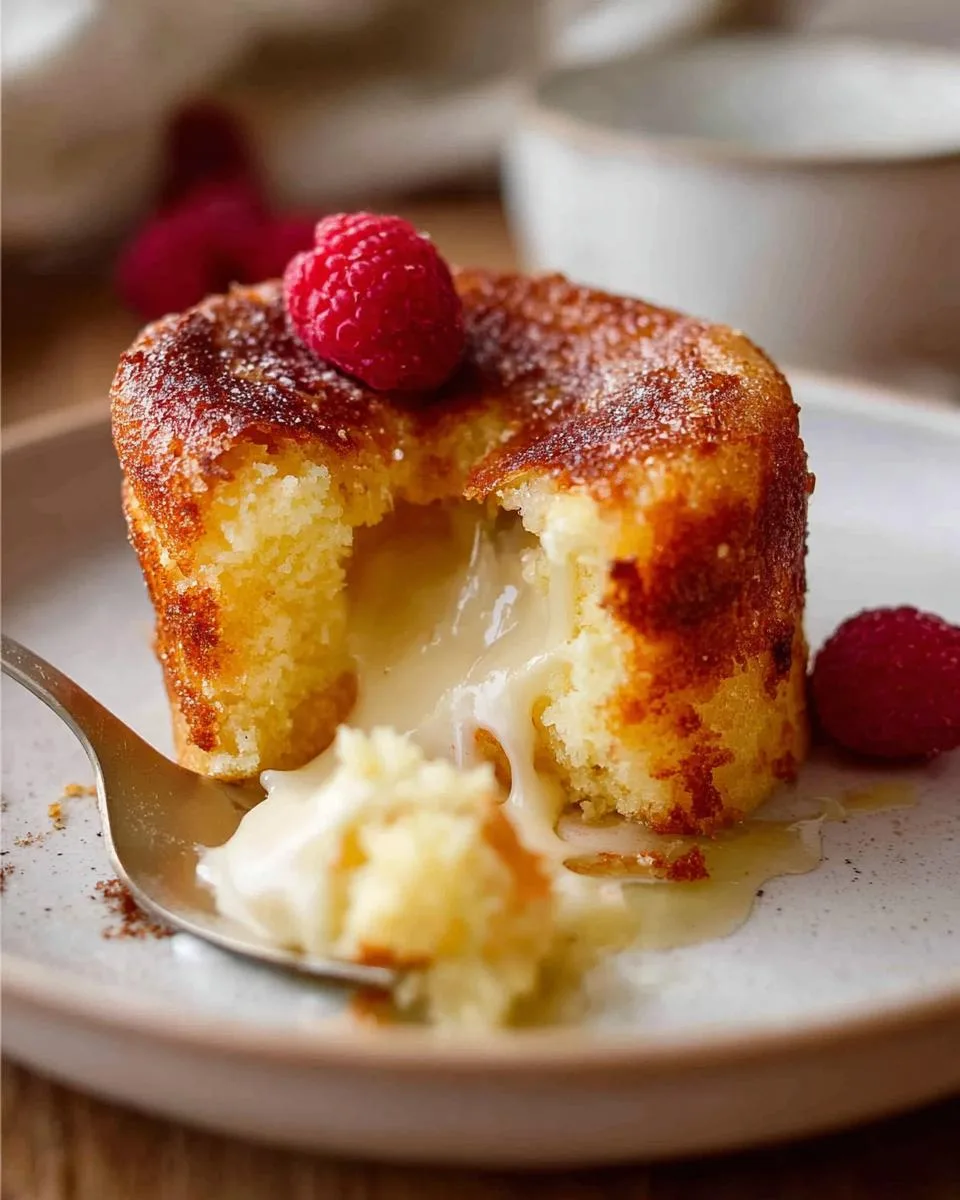
The secret to a great lava cake isn’t complicated, it’s about using good white chocolate and trusting the bake time. This recipe gives you that gorgeous molten center every time, with a playful option to add a layer of tart raspberry jam. It’s the kind of treat that turns a regular Tuesday into something special or becomes the star of your dinner party. Let’s walk through how to make this dreamy dessert step by step.
Table of Contents
Why You’ll Love This White Chocolate Lava Cake
This recipe is my ultimate dessert trick, and I know it will become yours, too. It checks every box for a perfect sweet treat. Here’s exactly why it works so well.
- Decadent & Impressive: The moment you crack into that warm cake and the white chocolate lava flows out is pure kitchen theater. It feels fancy and looks stunning on any plate.
- Surprisingly Simple: Don’t let the elegant result fool you. You only need a handful of basic ingredients and about 30 minutes of active time. It’s faster than running to the store for dessert.
- Customizable Center: I love the optional raspberry jam layer. It adds a bright, tart pop that cuts through the sweetness beautifully. You can easily swap it for another favorite, like salted caramel.
- Perfect Texture: Follow the simple steps, and you’ll get a tender, cakey shell that protects a smooth, velvety molten center. It’s the ideal contrast in every bite.
- Crowd-Pleasing Dessert: This cake is a universal win. It’s rich but not overly heavy, making it perfect for both white chocolate devotees and anyone who finds dark chocolate a bit too intense.
This easy white chocolate lava cake recipe delivers restaurant-quality results with minimal fuss. It’s the best molten lava cake for making any night feel celebratory.
Ingredients You’ll Need
Gathering quality ingredients is the first step to a perfect molten center. This is not the time to skimp. Each item plays a specific role in creating that magical flow of warm white chocolate. Here is your simple shopping list, broken down into logical groups.
The Chocolate & Fat
- 1/2 cup (1 stick) unsalted butter, plus extra for greasing: Using unsalted butter lets you control the salt level perfectly. You will melt most of it for the batter. Keep the extra for greasing your ramekins very, very well. This ensures a clean release every time.
- 8 ounces good-quality white chocolate, divided: You will use 6 ounces for the batter and save 2 ounces for the hidden molten center. Ingredient Note: This is the most important choice. Look for a bar labeled “white chocolate” where cocoa butter is the first fat listed. Avoid white baking chips or morsels. They are often made with vegetable oils and will not melt into that smooth, luxurious lava we want.
The Batter
- 1/4 cup granulated sugar: It might seem like a small amount, but white chocolate is already quite sweet. This adds just enough extra sweetness without overpowering.
- 2 large eggs + 2 large egg yolks: The whole eggs provide structure. The two extra yolks are my secret for incredible richness and that custardy, flowing texture inside the cake. Do not skip them.
- 1/4 cup all-purpose flour: This is the backbone that gives the cake its shape and creates that tender shell around the molten center.
- 1/4 teaspoon salt: A tiny pinch is essential. It balances all the sweetness and makes the white chocolate flavor taste deeper and more complex.
The Filling & Finish
- 1/4 cup raspberry jam (optional): This is my favorite playful twist. A spoonful in the middle adds a wonderful tart surprise that cuts through the sweetness. If your jam is very thick, give it a quick stir to loosen it before using.
- For garnish (optional): Powdered sugar for a snowy dusting, and fresh raspberries for a bright, pretty finish.
Substitution Tip: Not a raspberry fan? For a different twist, try a spoonful of orange marmalade or a dab of thick salted caramel sauce in the center instead. With these simple, quality ingredients on your counter, you are just minutes away from dessert magic.
How to Make White Chocolate Lava Cake
Ready to create some magic? This process is like a little kitchen dance. Follow these simple steps, trust the timing, and you will be rewarded with the most beautiful, flowing dessert. Let’s get started.
Step 1: Prep and Melt
First, turn your oven to 400°F (200°C). This preheat is non-negotiable. A hot oven is what gives the cakes their quick rise and sets the edges perfectly while leaving the center molten. While it heats, take your four 6-ounce ramekins and butter them generously with soft butter.
Get into every little corner. This is your insurance policy for a clean release later. Next, finely chop all 8 ounces of your good-quality white chocolate. Keep the 6-ounce and 2-ounce portions separate. Finally, melt the stick of butter in a microwave-safe bowl in 30-second bursts until it is completely liquid.
Step 2: Create the Chocolate Base
Place the 6 ounces of finely chopped white chocolate in a medium bowl. Carefully pour the hot melted butter over it. Now, walk away for one full minute. Let the butter’s residual heat gently begin melting the chocolate.
This gentle warming prevents the chocolate from seizing up. After a minute, stir slowly with a spatula. You will see it turn into a smooth, glossy, pale mixture. This is your luxurious chocolate base.
Step 3: Whisk the Eggs and Sugar
In a separate bowl, combine the granulated sugar, two whole eggs, and two egg yolks. Use a whisk and beat them together for about 1-2 minutes. You are not just mixing. You are looking for the mixture to become pale yellow and slightly thickened. This step incorporates air, which gives our lava cakes a delicate, tender structure. When you lift the whisk, the mixture should ribbon back onto itself.
Step 4: Combine and Fold
Here is where it all comes together. Slowly pour the warm (not piping hot) white chocolate mixture into the egg mixture while whisking constantly. Keep whisking until you have one beautifully smooth, homogeneous batter.
Now, add the flour and salt right on top. Put the whisk away and grab a spatula. Gently fold the dry ingredients into the wet batter. Stop the moment you see no more white streaks of flour. A few tiny lumps are fine. Overmixing is the enemy of a tender cake.
Step 5: Layer the Batter and Filling
Grab your buttered ramekins. Divide about half of the batter evenly among them. If you are using the raspberry jam, spoon about one tablespoon right into the center of the batter in each cup. Take the reserved 2 ounces of chopped white chocolate and place a few small chunks right on top of the jam.
This is your hidden molten treasure. Now, carefully spoon the remaining batter over the top, dividing it evenly. Gently smooth the tops to completely seal in the jam and chocolate chunks.
Step 6: Bake and Serve
Place the filled ramekins on a baking sheet for easy handling. Slide them into your fully preheated oven. Set your timer for 12 minutes. This is the most important part. At 12 minutes, the tops should be set and the edges will pull slightly away from the ramekin.
The very center will look soft and will jiggle like firm jelly when you gently shake the pan. If it seems too liquid, give it 1 more minute, but no more. Overbaking cooks the lava solid. Immediately take them out. Let them rest for just 60 seconds on the counter. Then, run a thin knife around the inside edge of each ramekin.
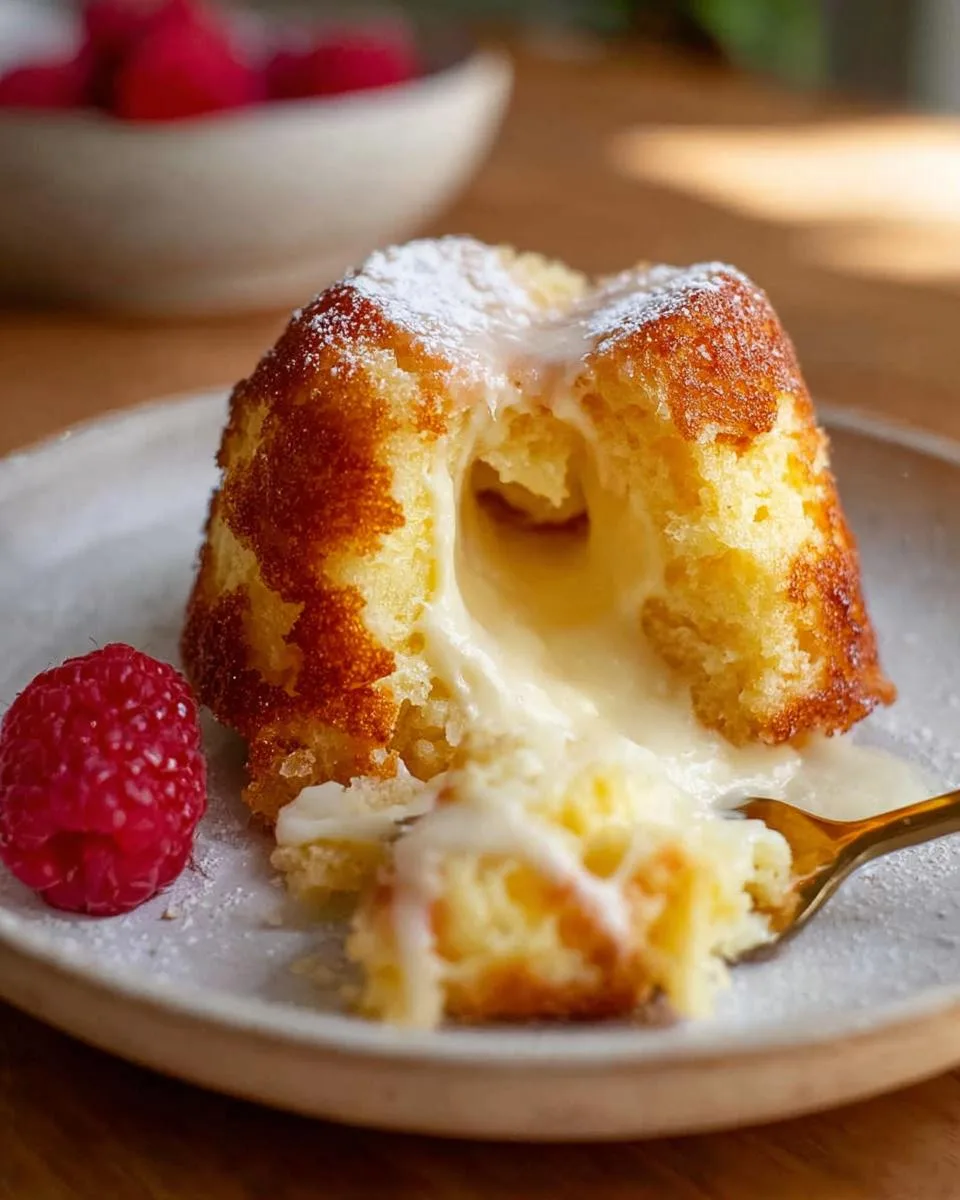
Place a serving plate on top, flip it over with confidence, and lift the ramekin. Your perfect white chocolate lava cake is ready to serve, warm and wonderful.
Pro Tips for the Best White Chocolate Lava Cake
These little cakes are forgiving, but a few insider tricks guarantee a flawless result every single time. Here are my best tips for perfect white chocolate lava cakes.
- Chocolate Quality is Key: Always choose a bar, not chips. A good white chocolate bar with real cocoa butter melts into a silky, rich lava. Chips are designed to hold their shape and will leave you with a disappointing, lumpy center.
- Trust the Jiggle, Don’t Overbake: The 12-14 minute window is everything. At 12 minutes, check for a set top and edges that are just pulling away. The center should look soft and jiggle like firm jelly when you gently shake the pan. Remember, the cake keeps cooking from residual heat once it’s out of the oven.
- Butter Your Ramekins Like You Mean It: For a clean release, use soft butter and coat every single surface of the ramekin. I go a step further and give them a light dusting of flour after buttering. Tap out the excess. This creates a non-stick barrier so your beautiful cake slides out in one piece.
- Serve Straight from the Oven: Timing is part of the magic. Have your plates and garnishes ready. These cakes are meant to be eaten immediately, while the center is gloriously warm and molten. That first spoonful is the best part.
- Test a Single Cake First: If your oven runs hot or you are using a different dish, bake just one cake as a test. Note the perfect time for your setup, then bake the remaining three with confidence. It is a foolproof way to master the timing.
Follow these baking tips, and you will master the perfect molten center with ease. Your choice of white chocolate and your watch are the most important tools you will use.
Common Mistakes to Avoid
Even the best recipes can have a hiccup. Knowing these common pitfalls ahead of time will make your white chocolate lava cakes foolproof. Here’s what to watch for.
- Using low-quality white chocolate. Why: White baking chips are made with oils that don’t melt smoothly. They leave a grainy, solid center instead of silky lava. How to fix: Always buy a bar where “cocoa butter” is in the ingredients. Chop it finely for the batter.
- Overbaking the cakes. Why: Just one extra minute in the oven can cook the molten center completely solid. How to fix: Pull them at 12 minutes. The tops will look set and dry, but the center must still jiggle when you gently shake the pan.
- Not greasing ramekins well. Why: Any unbuttered spot will glue the cake to the dish, causing it to tear when you flip it. How to fix: Use softened butter and a pastry brush to coat every nook, including the top rim. For extra security, dust with a bit of flour after buttering.
- Skipping the rest time. Why: Inverting a scorching-hot cake straight from the oven can make it collapse under its own weight. How to fix: Let the ramekins sit on the counter for exactly 60 seconds after baking. This lets the structure firm up just enough for a clean release.
Don’t panic if your first one isn’t perfect. Cooking is all about learning. Now you know exactly what to do next time.
Delicious Variations
The classic version is perfect, but I love playing with flavors. This white chocolate lava cake recipe is a wonderful canvas for your favorite ingredients. Try one of these easy twists next time you bake.
- Citrus Burst: Add one teaspoon of finely grated lemon or orange zest to the batter when you whisk the eggs and sugar. For the filling, use a teaspoon of store-bought or homemade lemon curd instead of raspberry jam. The bright, zesty flavor cuts through the sweetness beautifully.
- Nutty Delight: For a lovely crunch, fold two tablespoons of very finely chopped toasted hazelnuts or pistachios into the finished batter right before you fill the ramekins. The toasted nuts add a fantastic texture and rich flavor that pairs so well with white chocolate.
- Salted Caramel Swirl: Swap the raspberry jam for a heaping teaspoon of thick, good-quality salted caramel sauce. The sweet-salty combination with the molten white chocolate is absolutely irresistible. Make sure your caramel is thick so it doesn’t leak out during baking.
- Dark Chocolate Hybrid: Can’t decide between white and dark chocolate? Use four ounces of white chocolate for the batter and two ounces of finely chopped dark chocolate (70% works great) for the hidden center pieces. You will get a marbled flavor that is rich, deep, and incredibly satisfying.
Mixing and matching these ideas is half the fun. Start with the classic, then make it your own.
Serving Suggestions
This white chocolate lava cake is a star all on its own, but a little styling turns it into a full dessert experience. Here are my favorite ways to serve it, depending on the occasion.
- Dinner Party Elegance: For a beautiful plate, dust the cake with powdered sugar and add a fresh raspberry on the side. A simple drizzle of store-bought raspberry coulis or even the leftover jam (thinned with a drop of water) makes it look professionally done. A single mint leaf adds that final touch of color.
- Weekend Indulgence: This is my family’s favorite. Place a warm cake in a shallow bowl and immediately top it with a scoop of high-quality vanilla bean ice cream. The hot molten center and the cold, creamy ice cream melting together is pure happiness.
- Coffee Date: The sweetness of the cake pairs perfectly with a strong, bitter coffee. Serve each cake with a small cup of freshly brewed espresso or a dark roast coffee. The coffee cuts through the richness for a perfectly balanced bite.
- Summer Berry Fest: In the warmer months, I skip the jam inside and instead pile the top with fresh mixed berries like raspberries, blackberries, and sliced strawberries. Add a dollop of lightly sweetened whipped cream. It feels light, fresh, and incredibly festive.
This dessert stands alone beautifully, but it also works wonderfully as the centerpiece of a larger dessert spread with fresh fruit and coffee.
FAQs About White Chocolate Lava Cake
Can I make white chocolate lava cakes ahead of time?
Yes, you can prep them ahead. Assemble the filled ramekins, cover them tightly with plastic wrap, and refrigerate for up to 24 hours. When you are ready to bake, let them sit on the counter for 20 minutes to take the chill off. You will likely need to add 1 to 2 extra minutes to the baking time since they are starting cold.
Why is my lava cake not molten inside?
The number one reason is overbaking. Your oven must be fully preheated to 400°F, and you must not exceed the 12-14 minute window. The perfect sign is a set top and edges that pull away slightly, while the center still looks soft and jiggles like jelly when you gently shake the pan.
Can I use a muffin tin instead of ramekins?
Absolutely. A standard 12-cup muffin tin works well. Grease the cups very generously with butter. The baking time will be a bit shorter because the cakes are shallower. Start checking for doneness at 10 minutes, looking for that same set-edge, jiggly-center result.
What are the nutrition facts for a white chocolate lava cake?
Nutrition details depend on your exact ingredients. Using the full recipe with good quality chocolate and butter, one cake is a rich, decadent treat with approximately 450 to 500 calories. It contains significant sugar and fat from the chocolate and butter. For your specific dietary needs, I recommend calculating with the brands you use.
My cake stuck to the ramekin. What happened?
This usually means the ramekins were not greased well enough. Next time, use softened butter and coat every single surface, including the top rim. For extra insurance, after buttering, give each ramekin a light dusting of flour and tap out the excess before adding the batter.
Your New Go-To White Chocolate Lava Cake
You now have everything you need to make a simple, elegant, and reliably delicious dessert. This white chocolate lava cake recipe proves that a little bit of magic is totally doable on a busy night. I really hope you give the raspberry jam variation a try. That sweet-tart surprise makes it extra special.
When you make it, I’d love to hear how yours turns out. Leave a comment or a rating right here on the blog to let me know. For more easy, decadent dessert ideas that never disappoint, come find me on Pinterest. Happy baking.
Print
White Chocolate Lava Cake
- Total Time: 34 minutes
- Yield: 4 servings 1x
- Diet: Vegetarian
Description
Rich and decadent individual white chocolate cakes with a molten center that flows out when cut, perfect for a special dessert.
Ingredients
- 1/2 cup (1 stick) unsalted butter, plus more for greasing
- 6 ounces good-quality white chocolate, finely chopped, plus 2 ounces for the filling
- 1/4 cup granulated sugar
- 2 large eggs
- 2 large egg yolks
- 1/4 cup all-purpose flour
- 1/4 teaspoon salt
- 1/4 cup raspberry jam (optional, for an extra layer of flavor)
- Fresh raspberries, for garnish (optional)
- Powdered sugar, for dusting (optional)
Instructions
- Preheat your oven to 400°F (200°C). Generously butter four 6-ounce ramekins.
- Melt the 1/2 cup of butter in a microwave-safe bowl in 30-second intervals, stirring between each, until completely liquid.
- Place the 6 ounces of chopped white chocolate in a separate medium bowl. Pour the melted butter over it and let sit for 1 minute, then stir until smooth.
- In another bowl, whisk together the granulated sugar, whole eggs, and egg yolks until well combined and slightly pale.
- Gradually whisk the melted white chocolate mixture into the egg mixture until smooth.
- Add the flour and salt and fold them in gently just until no dry streaks remain.
- Divide half of the batter evenly among the prepared ramekins. If using raspberry jam, spoon about 1 tablespoon into the center of the batter in each ramekin.
- Gently chop or break the remaining 2 ounces of white chocolate into small pieces and place a piece or two on top of the jam in each ramekin.
- Top with the remaining batter, dividing it evenly, ensuring the jam and extra chocolate are covered.
- Place the ramekins on a baking sheet. Bake for 12-14 minutes, or until the edges are set but the centers are still soft and slightly jiggly.
- Carefully run a thin knife around the edges of each ramekin to loosen the cakes. Invert each ramekin onto a serving plate.
- Serve immediately.
Notes
- Use good-quality white chocolate that contains cocoa butter for best results.
- Do not overbake, as the lava center is key to this dessert’s appeal.
- The raspberry jam is optional but adds a lovely tart contrast to the sweet white chocolate.
- If you don’t have ramekins, a standard muffin tin can be used; adjust baking time as needed.
- Prep Time: 20 minutes
- Cook Time: 14 minutes
- Category: Dessert
- Method: Baking
- Cuisine: American
Nutrition
- Serving Size: 1 cake
- Calories: 450
- Sugar: 30g
- Sodium: 150mg
- Fat: 30g
- Saturated Fat: 18g
- Unsaturated Fat: 10g
- Trans Fat: 0g
- Carbohydrates: 40g
- Fiber: 0g
- Protein: 6g
- Cholesterol: 200mg
Keywords: white chocolate lava cake, molten cake, dessert, individual cake, white chocolate dessert