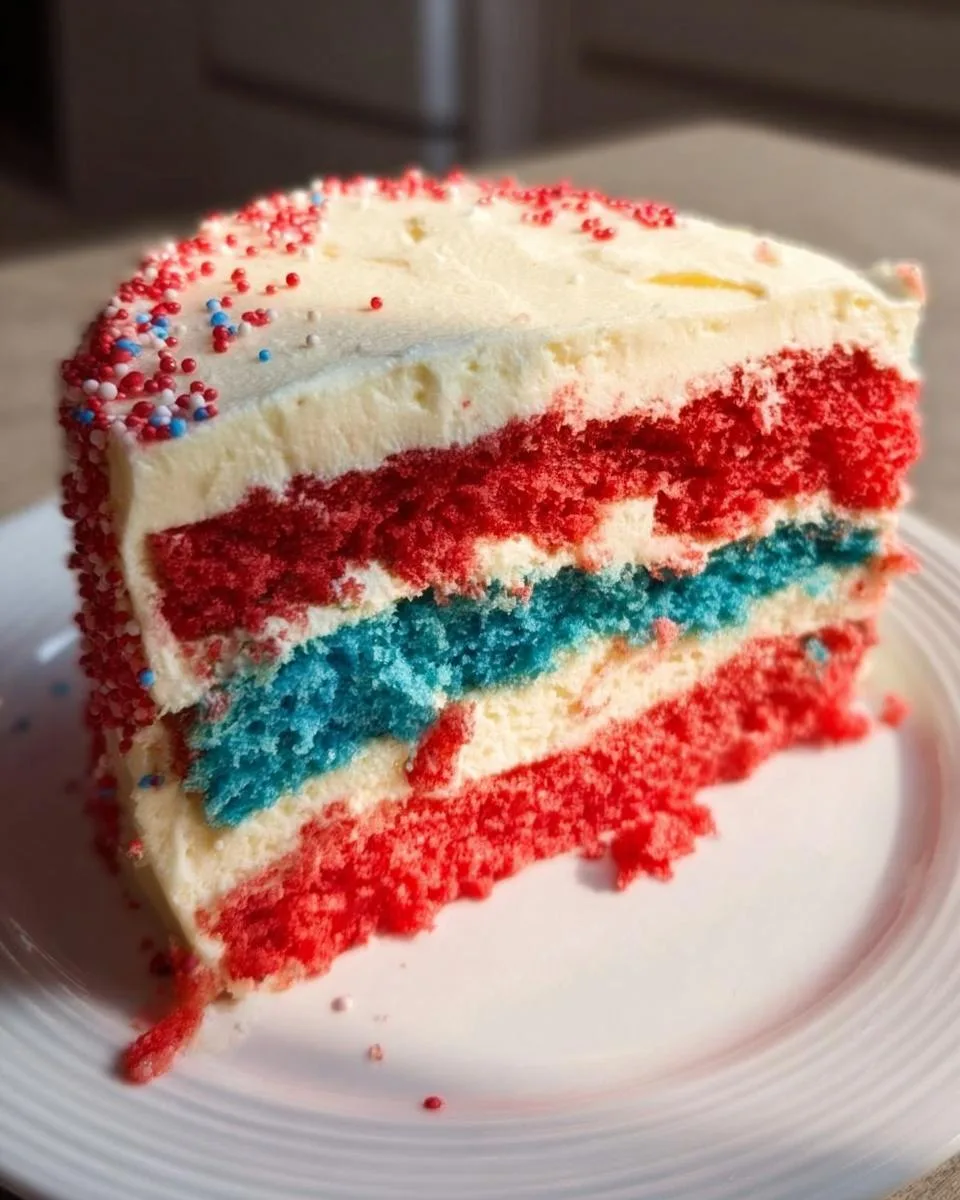
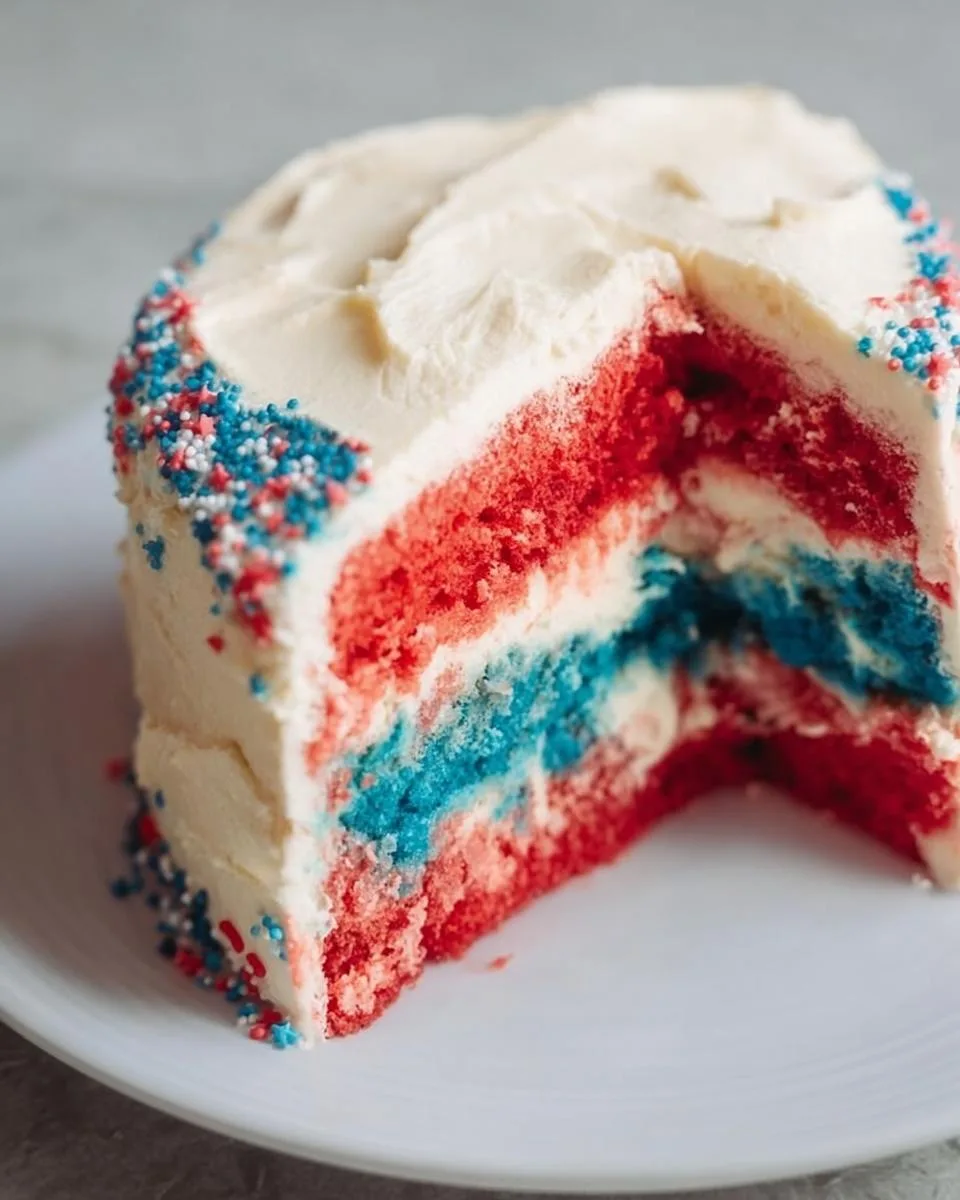
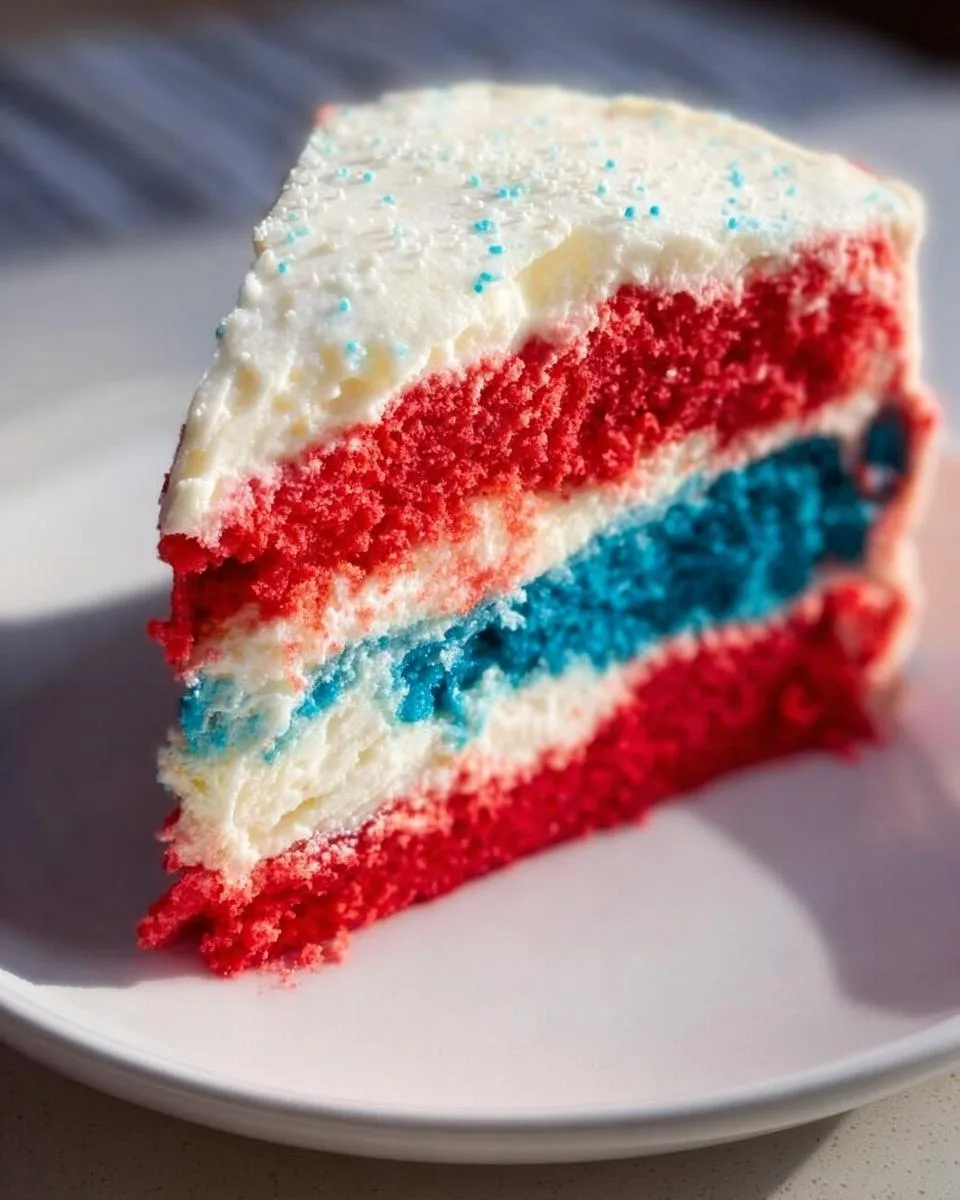
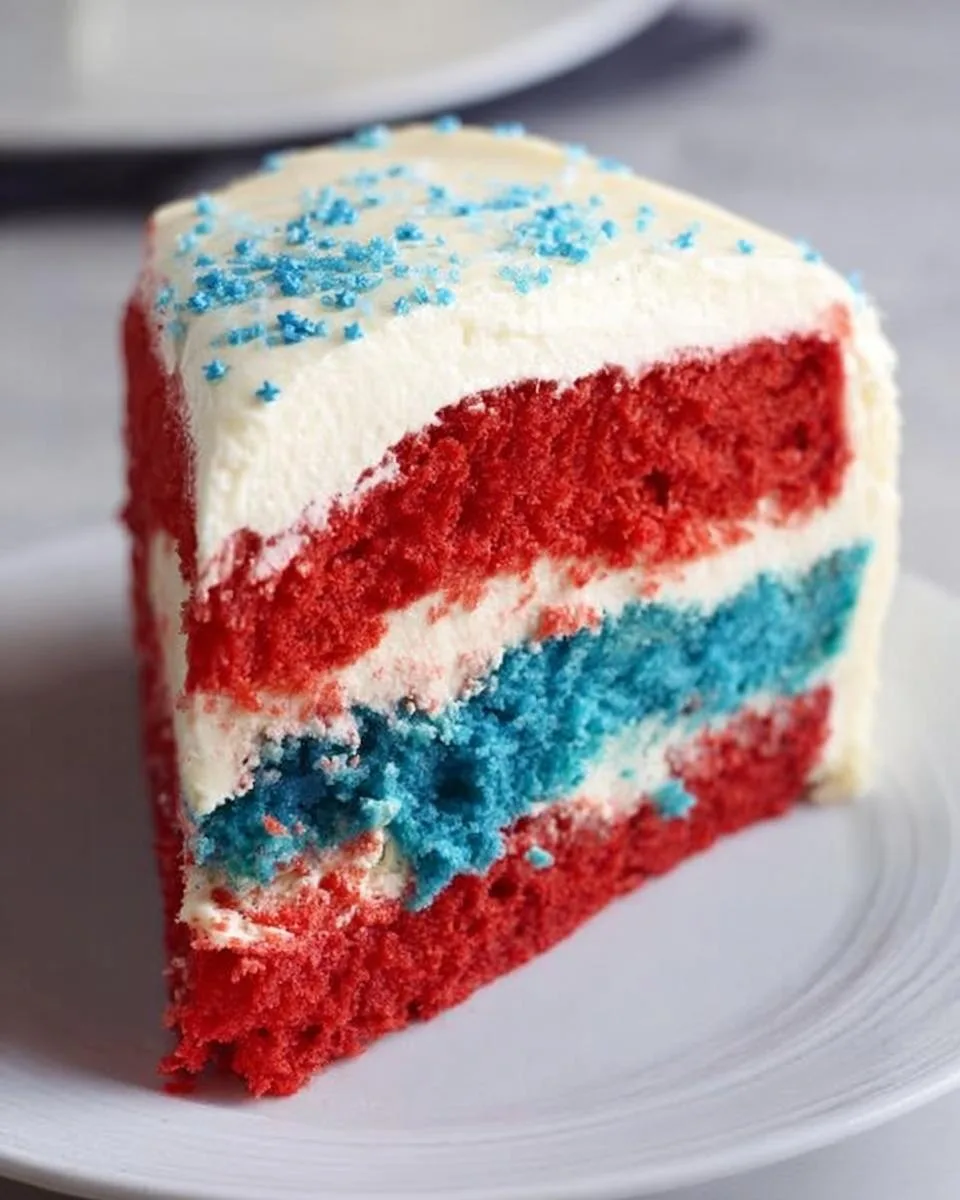
Need a stunning patriotic cake that looks professional but is secretly simple? This Red White And Blue Cake is your answer. It combines vibrant boxed cake mixes with a luscious, no bake cheesecake filling for the ultimate celebratory dessert.
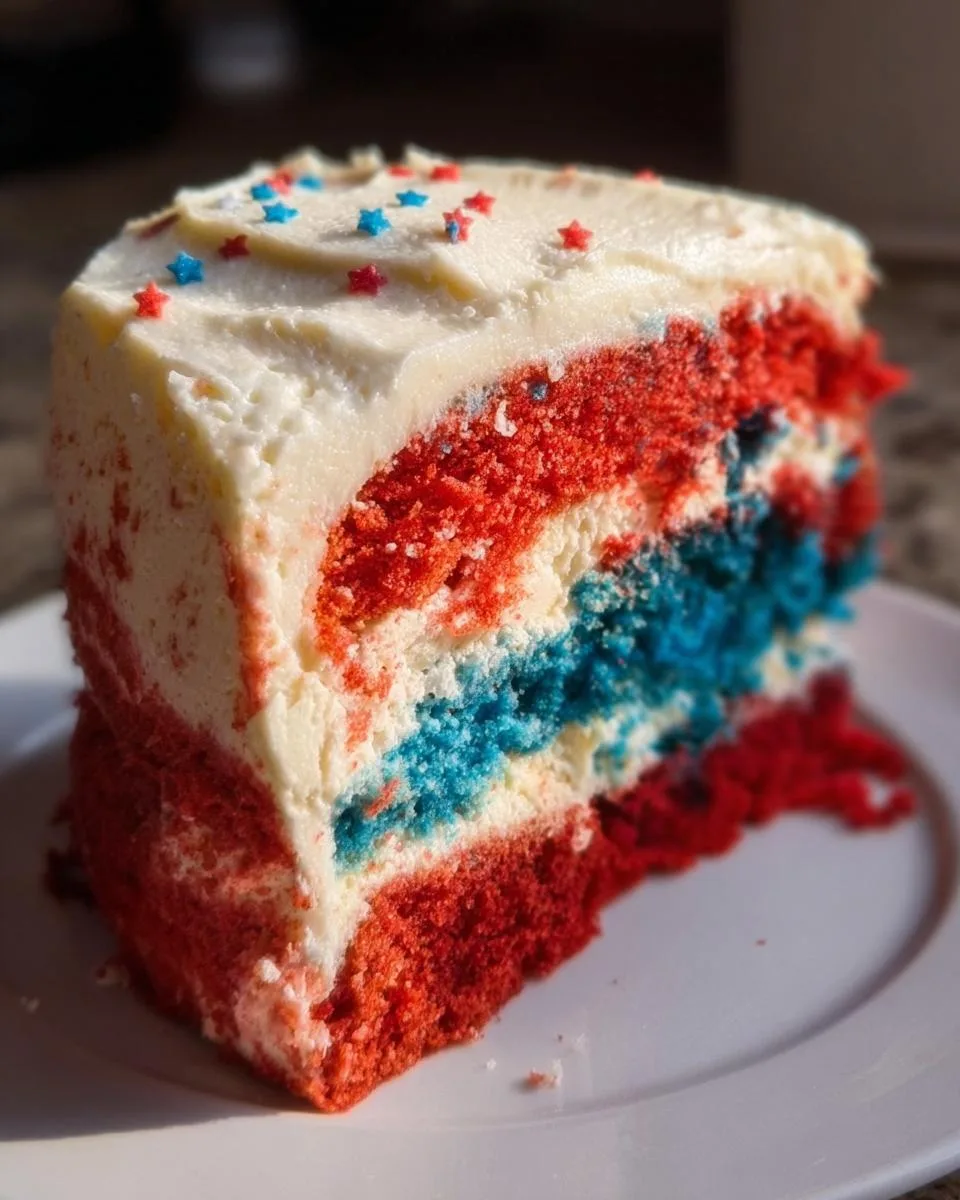
Picture slicing into it to reveal those perfect red, white, and blue layers. It’s pure joy on a plate. I make this every Fourth of July, and the “wow” from my family never gets old. The secret to this Red White And Blue Cake isn’t complicated, it’s about smart shortcuts and one incredible creamy filling. Here’s how it all comes together.
Table of Contents
Why You’ll Love This Red White And Blue Cake
This cake is more than just a dessert. It’s a guaranteed conversation starter that’s surprisingly simple to pull off. Here’s exactly why it’s become my go-to celebration cake.
- An Absolute Showstopper: Slicing into this cake to reveal those bright, patriotic layers never fails to get cheers. It looks like you spent all day baking, but we know the secret.
- Heavenly Texture & Flavor: You get the best of both worlds. The moist, tender cake mixes perfectly with the cool, creamy, and slightly tangy no-bake cheesecake filling. It’s a match made for summer.
- Smart & Simple Shortcuts: Using trusted boxed cake mixes takes the guesswork and stress out of baking the perfect layers. It lets you focus on the fun part, the assembly.
- Foolproof Cheesecake Filling: This filling comes together in minutes with no oven, no water bath, and no gelatin. Just fold whipped cream into sweetened cream cheese. It’s impossible to mess up.
- Your New Holiday Tradition: While perfect for the Fourth of July, this patriotic cake works for Memorial Day, Labor Day, or any summer potluck where you want to bring something special.
- Make-Ahead Magic: Bake and slice the cake layers a day or two before. On the day of your party, just stack, fill, and frost. No last-minute baking panic.
Trust me, this Red White And Blue Cake is the kind of recipe you’ll reach for year after year.
Ingredients You’ll Need
This Red White And Blue Cake is a brilliant mix of convenience and homemade heart. We use reliable box mixes for vibrant layers and a few key fresh ingredients for that luscious, creamy center. Here is your simple shopping list.
- For the Cake Layers:
- 1 (15.25 ounce) box red velvet or red cake mix
- 1 (15.25 ounce) box vanilla or white cake mix, plus blue food gel or 1 blue cake mix
- The oil, eggs, and water as listed on each cake mix box. Ingredient Note: Follow the package directions exactly for the right amount of moisture and lift. This guarantees a moist, tender crumb every time.
- For the No Bake Cheesecake Filling:
- 3 (8 ounce) packages full-fat cream cheese, softened. Ingredient Note: “Softened” is key. Leave it on the counter for 1-2 hours until it’s easily spreadable. This prevents a lumpy filling.
- 1 cup granulated sugar
- 1 teaspoon pure vanilla extract
- 1 cup cold heavy whipping cream
- For the Vanilla Frosting:
- 1/2 cup (1 stick) unsalted butter, softened
- 4 cups powdered sugar, sifted
- 1 teaspoon pure vanilla extract
- 1-2 tablespoons milk or heavy cream, as needed
- For Decoration (Optional):
- Red and blue sprinkles or sanding sugar
Substitution Tip: If you prefer from-scratch cakes, use your favorite red velvet and vanilla cake recipes. Just tint the vanilla batter a bold blue with gel food coloring.
The most important step happens before you even turn on the oven. Make sure your cream cheese, butter, and eggs are at the right temperature. It makes all the difference for a smooth, perfect cake.
How to Make Red White And Blue Cake
Let’s build this beauty together. The process is simple, but a few key steps make all the difference between a good cake and a great one. Follow along for perfect layers every time.
Step 1: Bake and Cool the Cake Layers
Preheat your oven to the temperature specified on your cake mix boxes, usually 350°F. Grease and flour two 8-inch round cake pans, or line them with parchment paper for easy release. In two separate bowls, prepare each cake mix according to its package directions.
Pour the red batter into one pan and the blue batter into the other. Bake according to package times, until a toothpick inserted into the center comes out clean. Let the cakes cool in their pans for just 10 minutes. Then, run a knife around the edges and invert them onto a wire rack to cool completely.
Pro-Tip: For super clean cuts later, wrap the completely cooled cakes in plastic wrap and chill them in the fridge for 30 minutes.
Step 2: Prepare the No Bake Cheesecake Filling
While the cakes cool, make the creamy heart of this dessert. In a large bowl, beat the softened cream cheese and granulated sugar together until perfectly smooth and no lumps remain. In a separate, cold bowl, whip the heavy cream until it forms stiff peaks.
This means when you lift the beaters, the cream holds a firm point. Now, gently fold the whipped cream and vanilla extract into the cream cheese mixture. Use a spatula and a light hand to combine them until just uniform. Overmixing will deflate the cream. Refrigerate this filling while you work on the cake layers.
Step 3: Slice the Cake Layers
Once your cakes are completely cool (and chilled, if you went that route), it’s time to create more layers. Using a long, serrated bread knife, carefully slice each cake round in half horizontally. Imagine you’re splitting a hamburger bun. Go slowly and use a gentle sawing motion. You’ll end up with four thin layers total: two red and two blue.
Step 4: Assemble the Cake
Place one cake layer on your serving plate or cake stand. I like to start with a red layer. Spread a generous, even layer of the cheesecake filling over it, going almost to the edge. Top with a blue cake layer. Press down gently so it adheres.
Add another layer of filling, then a red layer, more filling, and finally, your last blue layer on top. You should have a beautiful stack of alternating colors. Give the whole stack a light press to secure it. Pop it in the fridge for 15 minutes. This quick chill helps the filling firm up, making the next step much easier.
Step 5: Make and Apply the Frosting
In a medium bowl, beat the softened butter and vanilla extract until creamy. Gradually add the sifted powdered sugar, beating on low at first to avoid a sugar cloud. Once incorporated, beat on medium-high until the frosting is light and fluffy.
If it seems too thick, add milk or cream, one tablespoon at a time, until it’s spreadable. Take your chilled cake from the fridge. Using an offset spatula, frost the top and sides with a thick, even layer. You can smooth it perfectly or create pretty swirls.
Step 6: Decorate and Chill
Now for the fun finish. Sprinkle the top with red and blue sprinkles while the frosting is still soft so they stick. The most important step is next. Refrigerate the entire cake for at least 1 full hour before serving. This allows the cheesecake filling to set firmly, ensuring you get those beautiful, clean slices when you cut into it.
Pro Tips for the Best Red White And Blue Cake
These simple tricks are my kitchen secrets. They make this patriotic cake look flawless and taste even better. A little extra care goes a long way.
- Get That Bold Blue Color: For a truly vibrant blue layer, use gel food coloring in your vanilla cake batter. It is much more concentrated than liquid dye, so you get a rich color without adding extra liquid that can thin your batter.
- Softening is Non-Negotiable: Your cream cheese and butter must be truly soft. If they are still cool, your frosting will be grainy and your filling lumpy. Let them sit out until they are easily spreadable with a spoon.
- Chill for Clean Cuts: Wrap your completely cooled cake rounds and chill them in the fridge for 30 minutes before slicing. A cold cake is firmer, so your serrated knife will glide through for perfect, crumb-free layers.
- Whip Cream Like a Pro: Place your bowl and beaters in the fridge for 10 minutes before whipping the heavy cream. A cold bowl helps the cream whip up faster and form those sturdy peaks we need.
- Charlotte’s Secret for Smooth Frosting: If you do not have a cake turntable, place your cake plate on a damp kitchen towel. You can spin the plate gently to help smooth the frosting around the sides with a spatula.
- Serve Picture-Perfect Slices: For the cleanest slices, dip a long knife in hot water and wipe it dry before each cut. The warm blade glides through the chilled cake and frosting without dragging.
Follow these tips, and your cake will not only taste incredible, it will look like it came from a bakery.
Common Mistakes to Avoid
A few easy-to-miss steps can make or break this Red White And Blue Cake. Knowing what to watch for ensures your dessert is stunning from the inside out.
- Using Cold Cream Cheese: This is the number one reason for a lumpy, grainy cheesecake filling. Cold cream cheese will not blend smoothly. Fix it: Plan ahead. Let your cream cheese blocks sit on the counter for 1-2 hours until they are soft to the touch.
- Overmixing the Cheesecake Filling: Once you fold the whipped cream in, aggressive stirring deflates it. You lose that light, airy texture. Fix it: Use a gentle hand and a spatula. Fold just until no white streaks remain.
- Frosting a Warm Cake: Even slightly warm layers will melt the butter in your frosting. It becomes a runny, sliding mess. Fix it: Patience is key. Let the cakes cool completely on a wire rack before you even think about assembling.
- Skipping the Final Chill: Cutting into the cake right after frosting is a recipe for a messy slice. The filling needs time to firm up. Fix it: That one-hour chill in the fridge is non-negotiable. It sets everything perfectly for clean cuts.
Don’t panic if you make a mistake. Most are easy to fix with a little patience and these simple tips.
Delicious Variations
This Red White And Blue Cake is a fantastic blueprint. Once you master the basic method, have fun making it your own. Here are a few of my favorite twists that always impress.
- Berry Bliss Explosion: For a fresh, fruity twist, toss a cup of fresh raspberries and blueberries with a teaspoon of sugar. Let them sit for 10 minutes to get juicy. As you assemble, add a spoonful of these macerated berries between the cake and cheesecake layers. The burst of tart fruit cuts through the richness beautifully.
- Sunshine Lemon Blueberry: Swap the blue cake mix for a lemon cake mix. The batter will be yellow, but once baked and layered, it gives a lovely sunny contrast. For an extra zing, add the zest of one lemon right into your vanilla frosting. It brightens up the whole dessert.
- Chocolate Lover’s Patriotic: If your crowd craves chocolate, use a devil’s food cake mix for your red layer. The deep, rich chocolate pairs wonderfully with the classic blue vanilla cake and the creamy white filling. It is a decadent crowd-pleaser.
- Perfect Party Cupcakes: Turn this showstopper into portable treats. Bake the red and blue batters as cupcakes. Once cool, use a spoon or cupcake corer to remove a bit of the center from each. Pipe in the cheesecake filling, then top with a swirl of vanilla frosting and a sprinkle. They are easy to serve and just as festive.
Serving Suggestions
This Red White And Blue Cake is a celebration centerpiece all on its own, but the right pairing can make the moment even more special. Here are my favorite ways to serve it, straight from my family table to yours.
- The Classic BBQ Finale: Bring this cake out after the burgers and dogs at your Fourth of July party. Serve slices with a bowl of fresh summer berries on the side. The juicy strawberries and blueberries echo the cake’s colors and add a bright, fresh contrast.
- For the Ultimate Indulgence: Place a small scoop of high-quality vanilla bean ice cream right next to a slice. The cold, creamy ice cream melting into the rich cake and cheesecake filling is pure heaven. It turns dessert into an event.
- Picnic or Potluck Perfect: This cake travels well once chilled. For a casual outdoor gathering, offer it with pitchers of freshly brewed iced tea or cold brew coffee. The slightly bitter drinks balance the cake’s sweetness perfectly.
- Smart Slicing for a Crowd: This is a rich, satisfying cake. You can easily serve 12 to 16 people by cutting thinner slices. Use a sharp knife for clean cuts, and watch everyone’s face light up when they see those beautiful layers.
No matter how you serve it, this cake brings a smile. It is the sweet, stunning finish your gathering deserves.
FAQs About Red White And Blue Cake
Can I make this cake ahead of time?
Absolutely, and I highly recommend it for stress-free entertaining. You can bake and slice the red and blue cake layers up to two days in advance. Wrap each layer tightly in plastic wrap and store them at room temperature. Assemble the cake with the cheesecake filling and frosting on the day you plan to serve it for the freshest taste and texture.
How should I store leftovers?
Because of the dairy-based cheesecake filling, this cake must be stored in the refrigerator. Keep it covered with a cake dome or loosely wrapped with plastic wrap. It will stay fresh and delicious for up to four days. The chilled cake slices beautifully, so you can enjoy perfect leftovers all week.
Can I freeze this cake?
You can freeze the unfrosted cake layers with great success. Wrap the completely cooled layers individually in plastic wrap and then in foil. Freeze them for up to two months. Thaw the wrapped layers in the refrigerator overnight before assembling. I do not recommend freezing the fully assembled cake with the cheesecake filling, as the texture can become watery upon thawing.
What is the estimated calorie count per serving?
This is a rich, celebratory dessert. A general estimate is approximately 550 to 600 calories per generous slice. For the most accurate count, use an online nutritional calculator with the exact brands and ingredients you use. Remember, it is a special occasion treat meant to be shared and savored.
My cake layers domed in the middle. What should I do?
Do not worry, this happens to everyone. Simply use a long serrated knife to carefully slice off the domed top to create a flat, even surface before you slice the layer in half. This step ensures your cake stack is stable and looks professional. You can snack on the trimmings as a baker’s treat.
Slice Into Your Celebratory Red White And Blue Cake
There you have it. Your secret to a stunning, showstopping patriotic cake that’s full of joy and flavor. Making this Red White And Blue Cake is about creating a moment, a sweet centerpiece that brings everyone together. I promise the look of delight when you slice into those vibrant layers is worth every minute.
Now it’s your turn. I can’t wait to see your masterpiece. Share a photo in the comments below. Don’t forget to follow me on Pinterest for more ideas. Happy baking, and happy celebrating.
Print
Red White And Blue Cake
- Total Time: 70 minutes
- Yield: 12 servings 1x
- Diet: Vegetarian
Description
A festive layered cake with red and blue cake layers, creamy no-bake cheesecake filling, and vanilla frosting, perfect for celebrations.
Ingredients
- 3 (8 ounce) packages cream cheese, softened
- 1 cup granulated sugar
- 2 teaspoons vanilla extract, divided
- 1 cup heavy whipping cream
- 1 (15.25 ounce) box red cake mix
- 1 (15.25 ounce) box blue cake mix
- Additional oil, eggs, and water as called for on cake mix boxes
- 1/2 cup (1 stick) unsalted butter, softened
- 4 cups powdered sugar
- Red and blue sprinkles (optional)
Instructions
- Preheat your oven to the temperature on your cake mix boxes. Prepare two 8-inch round cake pans by greasing and flouring them or lining with parchment paper.
- Prepare the red and blue cake mixes according to package directions. Pour one batter into each prepared pan.
- Bake the cakes as directed until a toothpick inserted in the center comes out clean. Cool in pans for 10 minutes, then invert onto a wire rack to cool completely.
- Make the cheesecake filling. Beat softened cream cheese and granulated sugar until smooth and creamy.
- Whip the heavy cream until stiff peaks form. Gently fold the whipped cream and 1 teaspoon of vanilla extract into the cream cheese mixture.
- Slice each cooled cake layer in half horizontally to create four thin layers.
- Place one red cake layer on a serving platter. Spread an even layer of cheesecake filling over it.
- Top with a blue cake layer, then another layer of cheesecake filling. Alternate red and blue cake layers with cheesecake filling, ending with a cake layer on top.
- Prepare the frosting. Beat softened butter with the remaining 1 teaspoon of vanilla extract until smooth.
- Gradually add powdered sugar, beating until light and fluffy. Add a tablespoon of milk or heavy cream if the frosting is too thick.
- Frost the entire cake generously with the vanilla frosting.
- Decorate with red and blue sprinkles if desired. Refrigerate for at least 1 hour before serving.
Notes
- Ensure your cream cheese and butter are truly softened for a smooth, lump-free frosting and cheesecake filling.
- Chill the baked cakes for 30 minutes before slicing for cleaner layers.
- Make the cake layers a day ahead and store them, well wrapped, at room temperature.
- Prep Time: 30 minutes
- Cook Time: 40 minutes
- Category: Dessert
- Method: Baking, No-Bake
- Cuisine: American
Nutrition
- Serving Size: 1 slice
- Calories: 550
- Sugar: 65g
- Sodium: 480mg
- Fat: 28g
- Saturated Fat: 16g
- Unsaturated Fat: 10g
- Trans Fat: 0.5g
- Carbohydrates: 85g
- Fiber: 1g
- Protein: 6g
- Cholesterol: 85mg
Keywords: festive cake, red white blue cake, Fourth of July dessert, layered cake, cheesecake filling