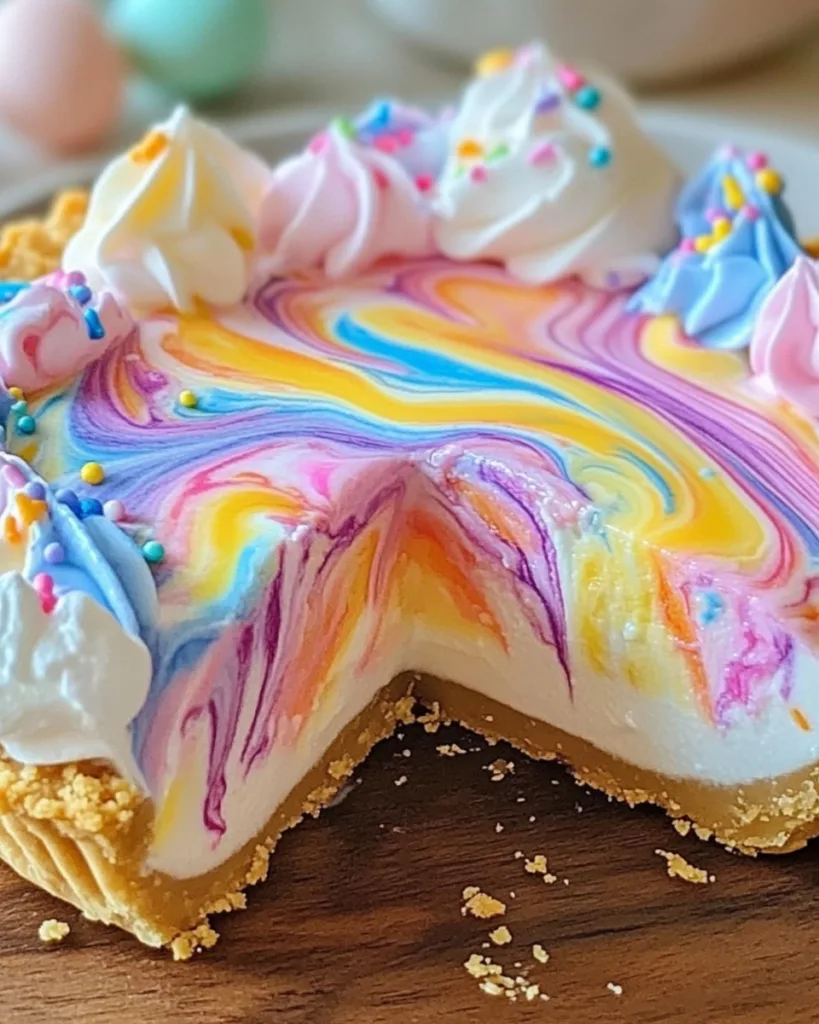
Nothing says Easter quite like pastel colors and creamy desserts! My Easter Swirl Pie has been stealing the show at family gatherings ever since I first whipped it up during a last-minute panic (we’ve all been there). The best part? It’s gloriously no-bake – just mix, swirl, and chill while you handle the rest of your holiday prep.
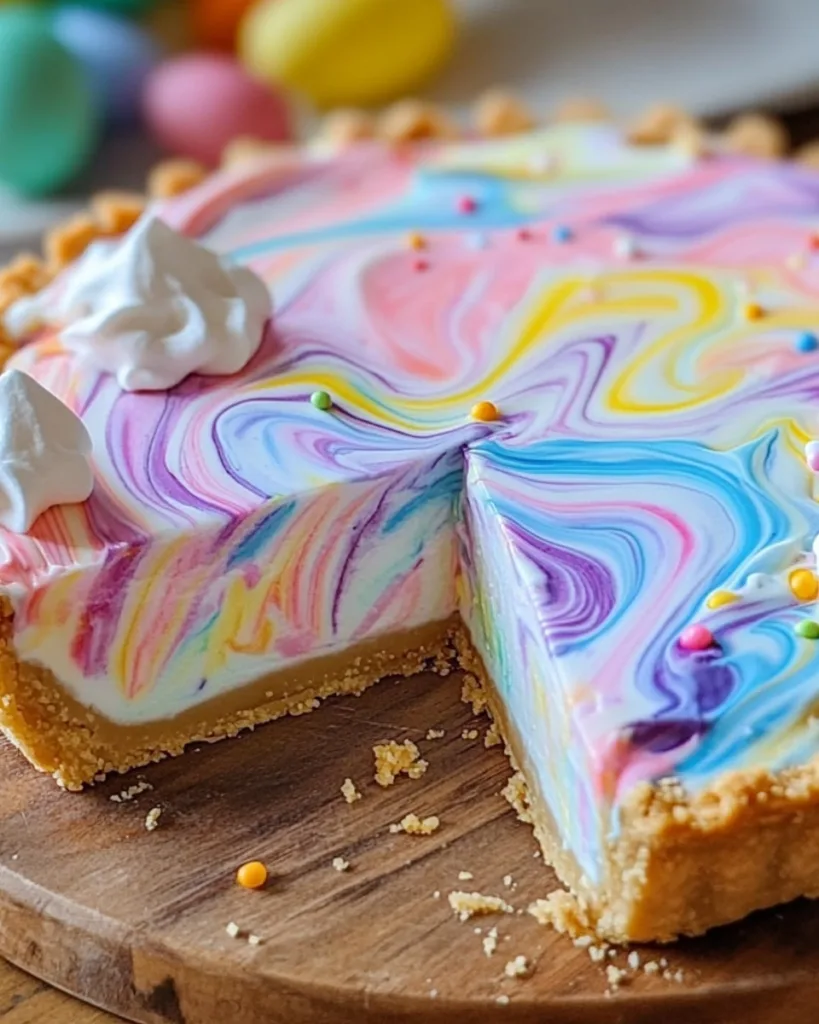
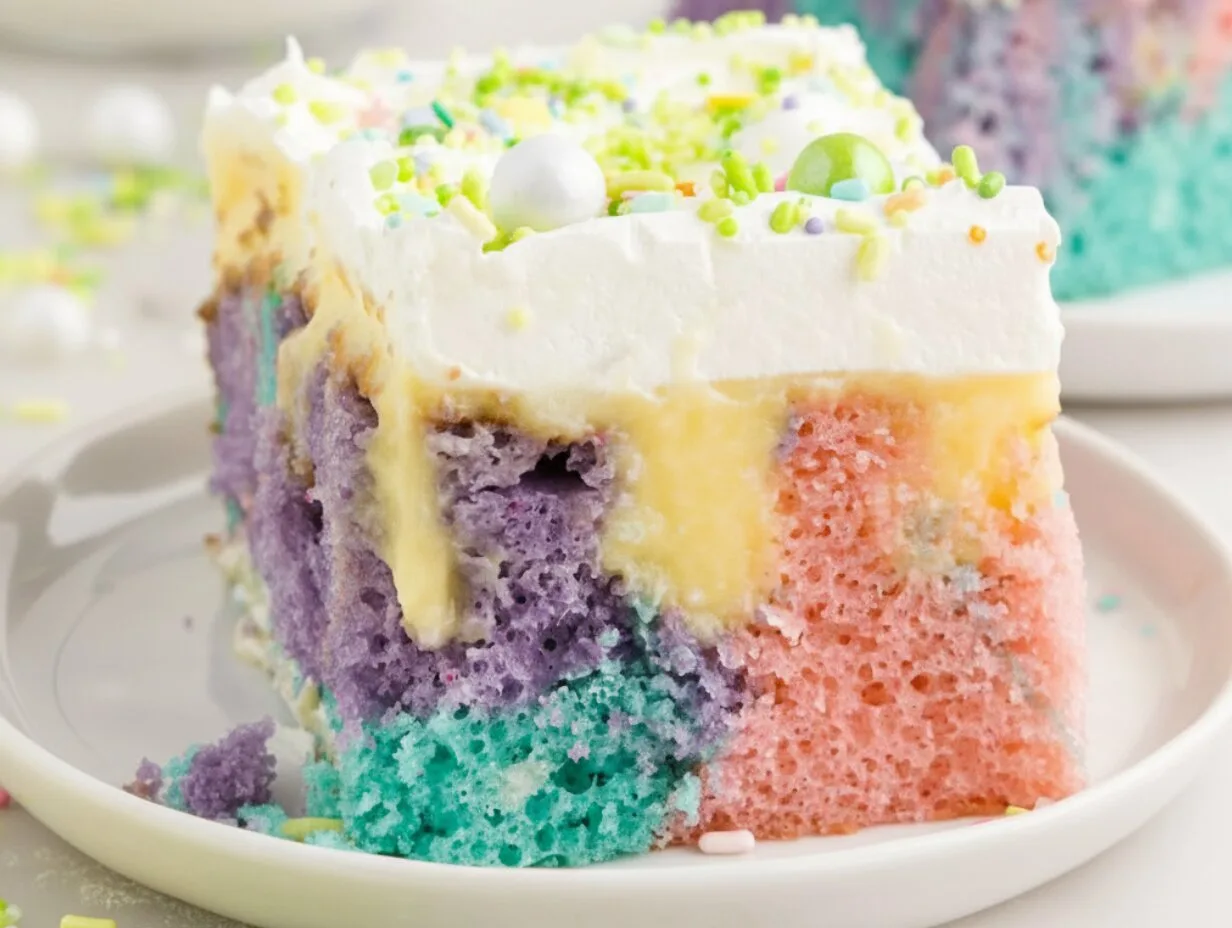
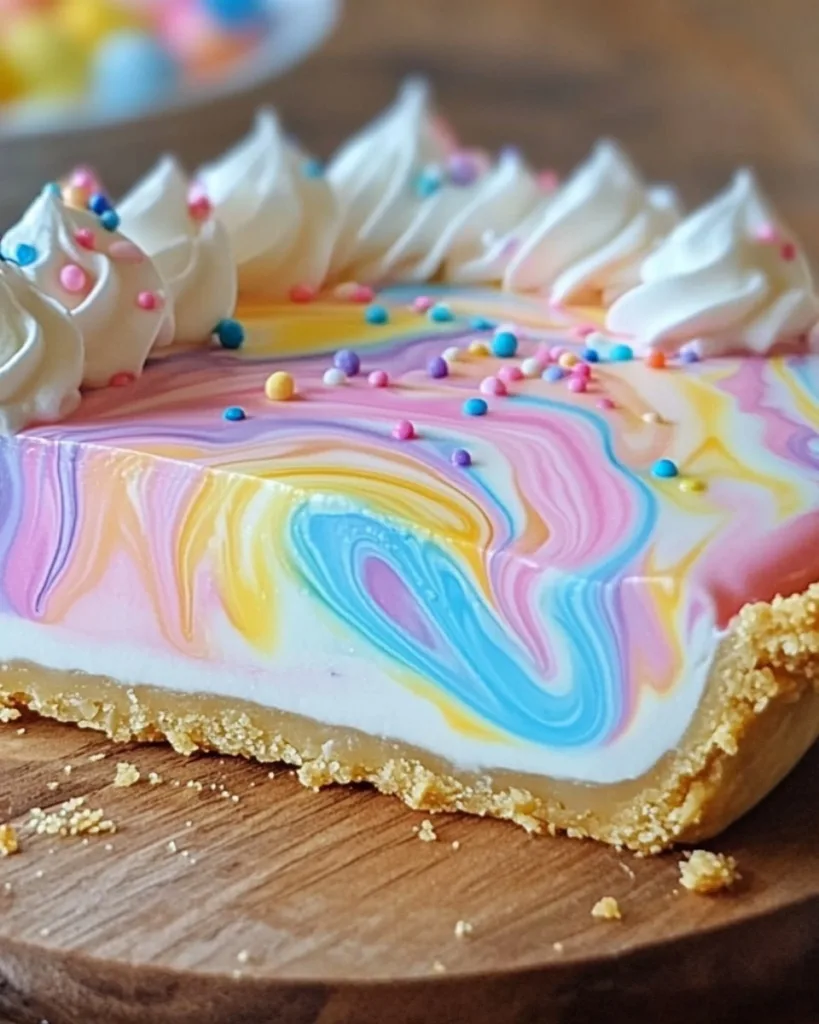
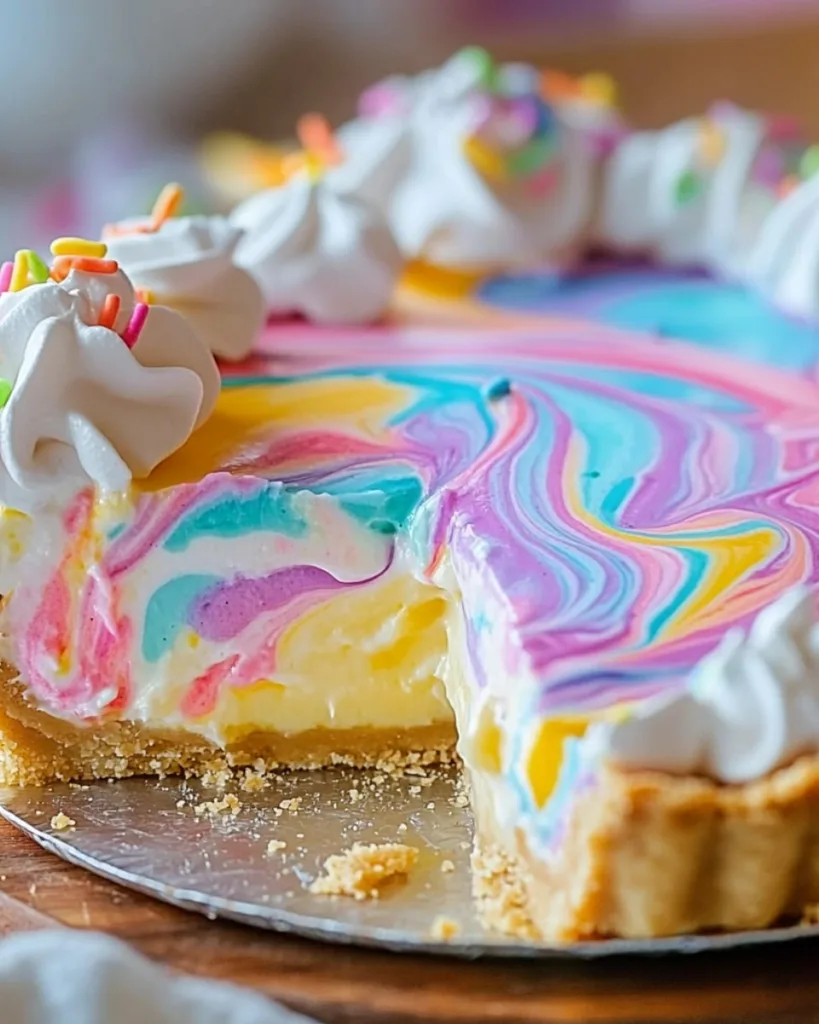
I’ll never forget my niece’s face when she saw the first slice reveal those dreamy swirls of pink, blue, and yellow. “It’s like eating Easter eggs!” she squealed. That’s exactly what I love about this recipe – it looks like you spent hours creating edible art, but really it comes together faster than dyeing eggs. The cream cheese filling is luxuriously smooth against the crisp graham cracker crust, and those vibrant swirls make every slice Instagram-worthy.
Whether you’re hosting brunch or bringing dessert to grandma’s house, this Easter Swirl Pie delivers big holiday vibes with minimal effort. Trust me, it’ll become your new spring tradition.
Table of Contents
Why You’ll Love This Easter Swirl Pie
This isn’t just another dessert, it’s pure Easter magic in pie form! Here’s why it’s become my go-to spring showstopper:
- No oven required: While everyone’s scrambling with their baked goods, you’ll be relaxing with this easy no-bake beauty.
- Instant holiday cheer: Those pastel swirls practically scream “Easter basket” – kids and adults alike go wild for the colorful slices.
- Creamy dreamy texture: The cream cheese and whipped topping combo creates a cloud-like filling that melts in your mouth.
- Foolproof fun: Even if your swirls aren’t perfect (mine never are!), it still looks gorgeous – the messier, the more charming!
- Make-ahead magic: Chill it overnight and cross one thing off your holiday to-do list early.
Honestly, the hardest part is waiting those two hours while it chills, but trust me, it’s worth every minute!
Ingredients for Easter Swirl Pie
Here’s what you’ll need to make this Easter Swirl Pie. I promise it’s all simple stuff you might already have in your kitchen:
- 8 oz cream cheese, softened: Leave it out for 30 minutes! Cold cream cheese will leave lumps no matter how long you beat it.
- 1 cup powdered sugar: Pack it like brown sugar when measuring, this isn’t the time to be shy!
- 1 teaspoon vanilla extract: The good stuff makes a difference here; skip the imitation.
- 1 ½ cups whipped topping: Thawed Cool Whip works great, but see my fresh whip tip below if you’re feeling fancy.
- 4-5 gel food coloring: Pastel shades like pink, blue, yellow, and purple make the prettiest Easter palette.
- 1 pre-made graham cracker crust: The 9-inch standard size is perfect. No shame in store-bought here!
- Whipped cream: For garnish, the more the merrier!
- Easter sprinkles: Those tiny egg-shaped ones are my weakness.
Ingredient Notes & Substitutions
Now let’s talk about making this Easter Swirl Pie recipe work with what you’ve got, because we’ve all had to improvise mid-recipe!
- Gel vs. liquid food coloring: I can’t stress enough – gel gives you those vibrant pastel hues without watering down your filling. The little jars last forever in your baking cabinet. If you must use liquid, start with just 2-3 drops per color and add slowly.
- Whipped topping alternatives: Not a Cool Whip fan? You can whip 1 cup heavy cream with 2 tablespoons powdered sugar until stiff peaks form. It’s dreamier but a bit less stable – serve the pie same day.
- Crust options: While graham cracker is classic, a shortbread or vanilla wafer crust works beautifully too. For a nutty twist, try blending pecans into your graham crumbs!
Remember: The cream cheese absolutely must be softened, and your whipped topping completely thawed. I learned this the hard way one frantic Easter morning with lumpy filling, not cute!
Equipment You’ll Need
Here’s the best part, you probably already have most of this stuff in your kitchen! No fancy gadgets required for this Easter Swirl Pie. Just grab these basics:
- Mixing bowls: You’ll need 4-5 small bowls for dividing and coloring the filling. I like using my little glass ones so I can see the colors better.
- Hand mixer or stand mixer: A hand mixer works perfectly for creaming the cream cheese and sugar. If you’ve got a stand mixer, even better – it’ll save your arm some work!
- Spatula: A good silicone spatula is your best friend for folding in the whipped topping without deflating it. Trust me, it makes a difference.
- Knife or toothpick: For swirling! I like using a butter knife because it’s easy to control, but a toothpick works for more delicate swirls.
- Measuring cups and spoons: For precision with the powdered sugar and vanilla – this isn’t the time to eyeball it!
- Whisk or fork: Handy for mixing the gel food coloring into the filling. A fork helps break up any stubborn clumps of color.
And that’s it! No special pans, no weird tools – just simple kitchen essentials. You’ll be swirling away in no time!
How to Make Easter Swirl Pie
This is where the magic happens! I’ll walk you through each simple step to create those gorgeous pastel swirls. The whole process takes just 20 minutes of active time, then the fridge does the rest of the work while you relax or prep other Easter dishes.
Step 1: Prepare the Filling
First, grab that softened cream cheese (remember, no shortcuts here!) and beat it with the powdered sugar and vanilla in a large bowl. Use medium speed on your mixer until it’s completely smooth – about 2 minutes. No lumps allowed! Now here’s the trick: switch to a spatula and gently fold in the whipped topping. No vigorous stirring! We’re aiming for light and fluffy, not dense. The mixture should look like pillowy clouds when you’re done.
Step 2: Color the Filling
Now for the fun part! Divide the filling evenly between 4-5 small bowls. I use a ¼ cup measure to keep my portions roughly equal. Add a different gel food coloring to each bowl – just a tiny drop at first! You can always add more for deeper colors. Stir each one gently with a fork until the color is fully incorporated. Pastel shades work best for Easter – think baby pink, minty green, soft yellow, and lavender. The colors will intensify slightly as the pie chills, so go lighter than you think!
Step 3: Assemble & Swirl
Time to create your edible masterpiece! Spoon dollops of different colored fillings randomly into your crust. Don’t worry about being perfect; the messier it looks at this stage, the better the swirls will be. Now take a butter knife and make about 3-4 gentle figure-eight motions through the filling. That’s it! Resist the urge to over-swirl or you’ll end up with a muddy-looking pie instead of pretty, defined colors. The knife should barely graze the surface – we’re not mixing, just creating swirls.
Step 4: Chill & Garnish
Pop your beautiful creation in the fridge for at least 2 hours, this is crucial for the pie to set properly. I usually make mine the night before Easter and let it chill overnight. When you’re ready to serve, pipe or dollop whipped cream around the edges and shower it with festive sprinkles. That first slice revealing the colorful swirls is always a showstopper moment! Just wait for the oohs and aahs from your family as you serve this Easter centerpiece.
Tips for the Perfect Easter Swirl Pie
After making this pie every Easter for the past decade (and a few kitchen disasters along the way), I’ve learned all the secrets to swirl success:
- Chill your crust first: Pop the empty graham cracker crust in the fridge for 10 minutes before filling – it helps prevent soggy bottoms!
- Gel colors are non-negotiable: They give you those Instagram-worthy pastels without making the filling runny. Start with just a toothpick dab of color – a little goes a long way.
- The swirl sweet spot: Make just 3-4 gentle passes with your knife. More than that and your colors will start to blend into a muddy mess. Less is more!
- Room temp is key: Let your colored fillings sit for 5 minutes before swirling – they’ll spread more evenly when they’re not ice-cold from the fridge.
- Wait for the big reveal: Let the pie chill the full 2 hours (I know it’s hard!). Cutting too early means your beautiful swirls might slump.
Remember, even if your swirls aren’t bakery-perfect, they’ll still taste amazing. Some of my most “rustic” looking pies have gotten the biggest compliments!
Serving Suggestions
This Easter Swirl Pie is practically begging to be the star of your holiday table! Here’s how I love to serve it for maximum wow factor:
- Brunch centerpiece: Slice it right at the table alongside your Easter ham or quiche. The pastel swirls look stunning against all those savory dishes. I like to arrange slices on vintage pastel plates I’ve collected from thrift stores, the mismatched colors make the pie pop even more!
- With coffee or tea: The creamy filling pairs perfectly with a hot cup of coffee after dinner. For an extra festive touch, serve with pastel-colored sugar cubes or marshmallows on the side. My aunt always says the pie tastes even better with her special lavender tea, the floral notes complement the sweet creaminess.
- Berry bonanza: Top each slice with fresh raspberries, blueberries, and mint leaves for a gorgeous spring look. The tart berries cut through the richness beautifully. Last year I arranged the berries in little nests around the pie, the kids went nuts for the “Easter egg hunt” presentation!
- Mini versions: For large gatherings, I make individual swirl pies in muffin tins with mini graham cracker crusts. They’re adorable lined up on a tiered stand with tiny dollops of whipped cream.
Bonus: No fighting over who gets the biggest slice!
However you serve it, don’t forget to snap a photo before everyone digs in. Those swirls disappear fast once the fork hits the plate!
Storage & Reheating
Here’s the good news:
This Easter Swirl Pie keeps beautifully in the fridge, which means you can make it ahead of time and check one more thing off your holiday prep list! Just cover it loosely with plastic wrap or foil (I like using one of those cute pie domes if I’m feeling fancy) and it’ll stay fresh for up to 3 days. The colors might deepen slightly as it chills, but those swirls will still look gorgeous.
Now, here’s what not to do:
- Don’t freeze it! I learned this lesson the hard way when I tried stashing a leftover slice in the freezer last year.
- The texture went from creamy and dreamy to slightly grainy when it thawed.
- The whipped topping just doesn’t hold up well to freezing.
- Trust me, this pie is so delicious it probably won’t last long enough to worry about freezing anyway, my family usually polishes it off by Easter afternoon!
If you need to transport your pie to grandma’s house or a potluck, just keep it chilled in a cooler with ice packs until serving time. Those delicate swirls can soften if left out too long in warm weather, so I try to keep it out of direct sunlight for no more than an hour. Pro tip: Bring the sprinkles and whipped cream in separate containers and add them right before serving for maximum freshness!
Nutritional Information For Easter Swirl Pie
Okay, let’s be real, we’re not eating pie for its health benefits! But since I know some folks like to keep track (or need to for dietary reasons), here’s the scoop on what’s in each slice of this Easter Swirl Pie.
Just remember: These numbers can change based on the exact brands you use and how generous you are with those sprinkles!
Per serving (1 slice, about 1/8 of the pie):
- Calories: Around 400 kcal (Consider it fuel for Easter egg hunting!)
- Sugar: 35g (It’s a holiday – treat yourself!)
- Sodium: 250mg
- Fat: 22g (12g saturated, 8g unsaturated)
- Carbohydrates: 45g (Just a smidge of fiber at 0.5g)
- Protein: 4g (Who knew pie could have protein?)
- Cholesterol: 40mg
Important note: These nutritional values are estimates based on standard ingredients and can vary depending on the specific brands you use and any substitutions you make. The numbers don’t include extra whipped cream or sprinkles (because let’s be honest, who measures those?). If you’re tracking nutrients closely, I recommend inputting your exact ingredients into a nutrition calculator.
Now go enjoy your slice without guilt, it’s Easter, after all! Everything in moderation, including moderation itself, right?
Easter Swirl Pie FAQs
Can I use liquid food coloring instead of gel?
You can, but be careful! Liquid colors will thin out your filling. Start with just 2-3 drops per color and add slowly. The colors won’t be as vibrant as with gel, but they’ll still give you pretty pastel swirls. If your filling gets too runny, pop it in the fridge for 15 minutes to firm up before swirling.
Help! My filling is too runny. How do I fix it?
First, don’t panic! This usually happens if the cream cheese wasn’t fully softened or the whipped topping wasn’t completely thawed. Stick the whole bowl in the fridge for 20 minutes, then gently fold in an extra ¼ cup of whipped topping to help stabilize it.
Can I make this pie ahead of time?
Absolutely! In fact, I recommend it. The pie needs at least 2 hours to chill, but overnight is even better. Just wait to add the whipped cream and sprinkles until right before serving so they stay fresh-looking. The colors actually get more vibrant after a night in the fridge!
What if I don’t have 4-5 colors for the swirls?
No worries! The pie looks just as pretty with two or three colors. I’ve made stunning versions with just pink and blue, or yellow and green. You can even do a single color with white swirls – it’ll still taste amazing.
Can I use homemade whipped cream instead of Cool Whip?
Yes, but with a caveat. Fresh whipped cream tastes incredible but doesn’t hold its shape as long. If you go this route, plan to serve the pie the same day you make it. Stabilize your whipped cream with a teaspoon of cornstarch or instant pudding mix to help it last a bit longer.
More Festive Pie and Dessert Recipes to Enjoy
If you love the delicious swirl and festive flavors of Easter Swirl Pie, these other pie and dessert recipes will add variety and sweetness to your holiday menu.
- Enjoy the classic richness of Boston Cream Pie, perfect for any celebration.
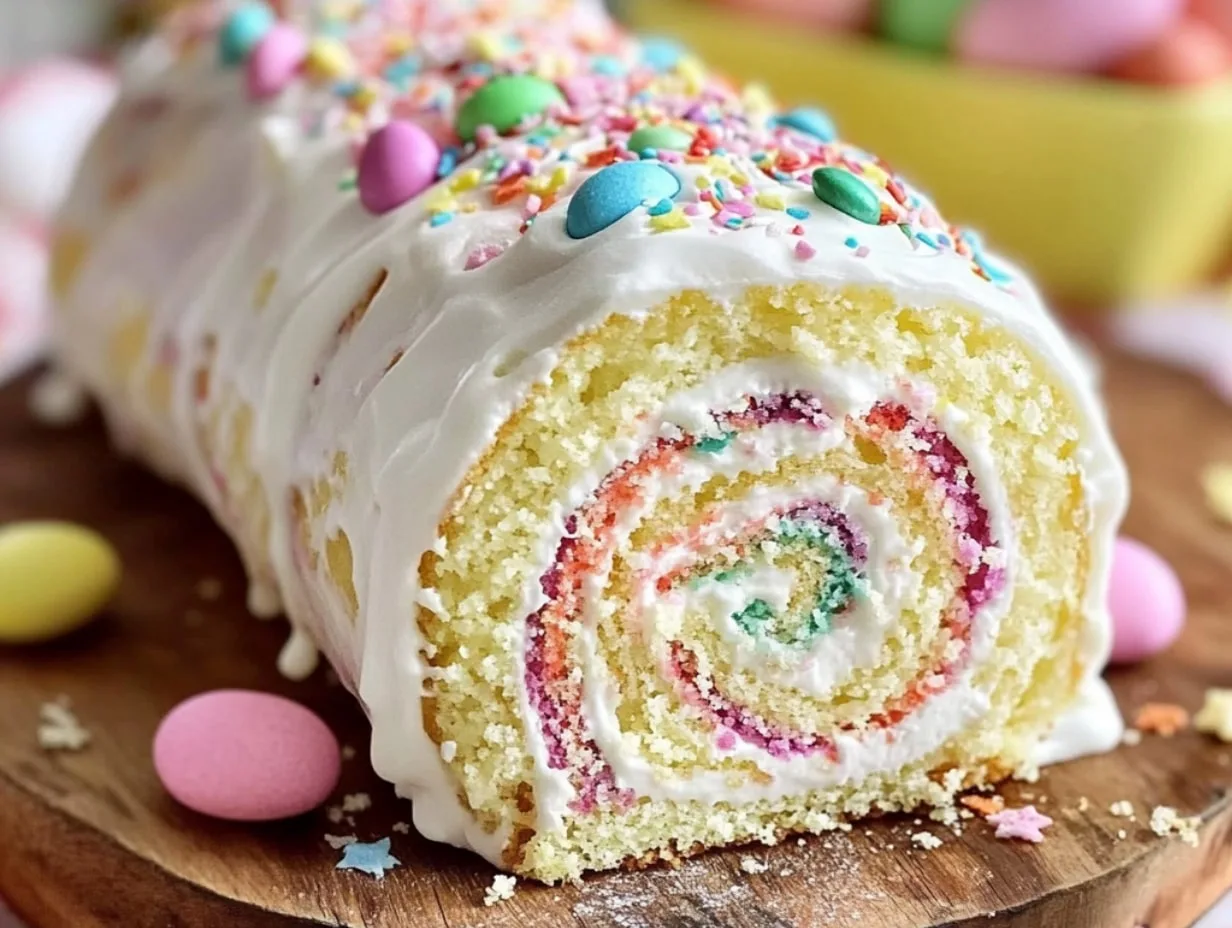
- Try the tropical twist of Hawaiian Carrot Pineapple Cake for a unique dessert experience.
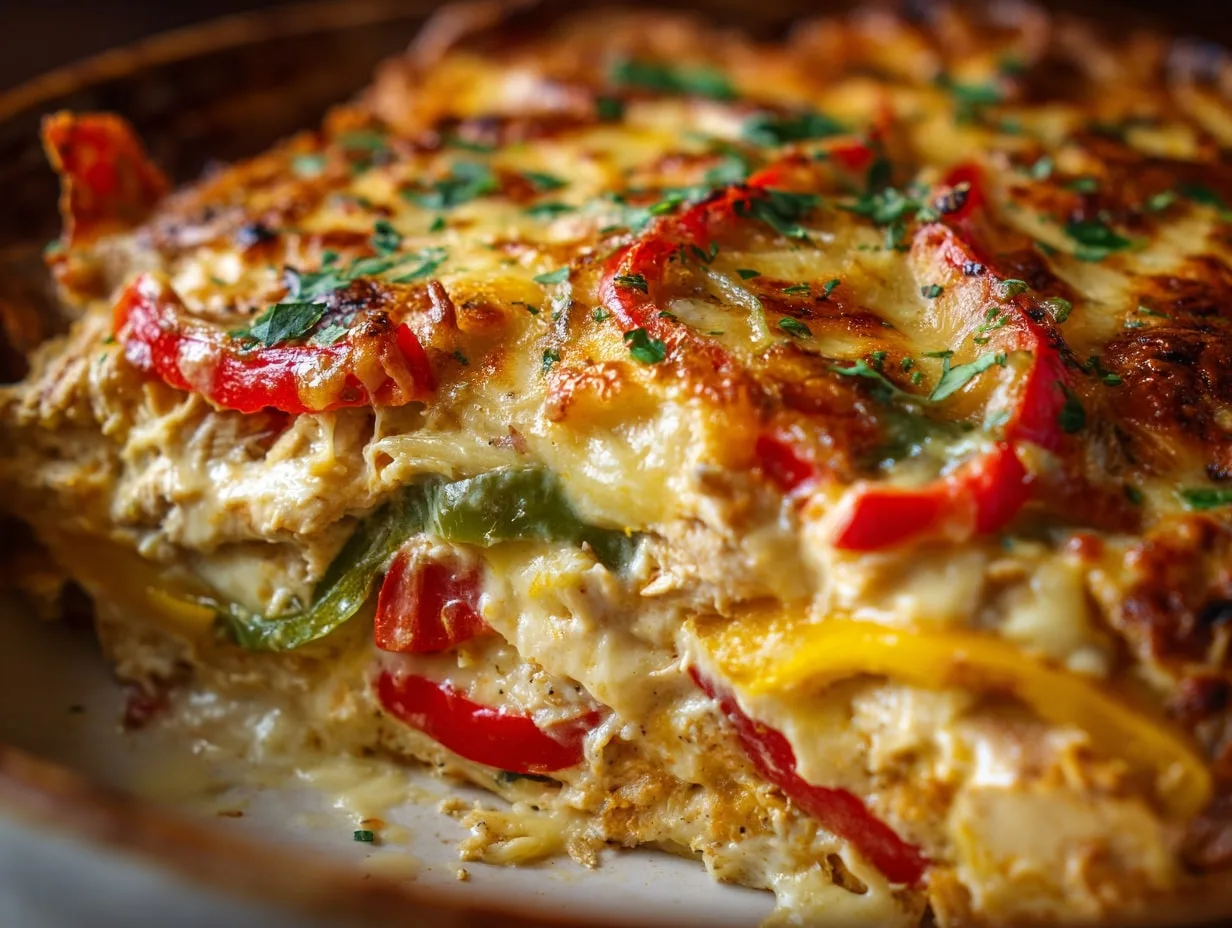
- Savor the indulgent layers of Chocolate Lasagna for a creamy chocolate delight.
- Bake the comforting and sweet Lazy Girl Pecan Pie Bars for an easy, crowd-pleasing treat.
Try these recipes to expand your festive dessert options with irresistible flavors and textures!
Time To Try! Easter Swirl Pie
I can’t wait to see your beautiful Easter Swirl Pie creations! There’s nothing I love more than scrolling through photos of all the colorful variations you brilliant bakers come up with. Did you try a new swirl technique? Use unexpected color combos? Let’s swap ideas!
Drop a comment below to tell me how your Easter Swirl Pie turned out, the good, the bad, and the gloriously messy. I read every single one (usually while nibbling on pie scraps, chef’s privilege!). And if you hit any snags, just ask. I’ve made every possible mistake with this recipe, so I can help troubleshoot.
Tag your pie photos on Instagram with #EasterSwirlPie so we can all ooh and aah over your edible artwork. I always feature my favorite creations in my stories. Your masterpiece might just inspire someone else’s holiday baking!
Happy swirling, friends! May your filling be creamy, your colors vibrant, and your Easter celebrations sweet.
Print
Easter Swirl Pie
- Total Time: 2 hours 20 minutes
- Yield: 8 servings 1x
- Diet: Vegetarian
Description
This Easter Swirl Pie is a stunning, no-bake dessert featuring creamy layers of pastel-colored filling swirled into a buttery graham cracker crust. Perfect for Easter brunch or spring gatherings, it’s as pretty as it is delicious!
Ingredients
- 8 oz cream cheese, softened
- 1 cup powdered sugar
- 1 teaspoon vanilla extract
- 1 ½ cups whipped topping (like Cool Whip)
- 4–5 gel food coloring (pastel shades: pink, blue, yellow, purple)
- 1 pre-made graham cracker crust
- Whipped cream (for garnish)
- Easter sprinkles (for garnish)
Instructions
- Prepare the Pie Filling: In a mixing bowl, beat softened cream cheese, powdered sugar, and vanilla extract until smooth and creamy. Gently fold in the whipped topping until fully combined. Divide the filling into 4-5 bowls and tint each with a different pastel gel food coloring.
- Assemble the Pie: Spoon the colored fillings into the graham cracker crust, alternating colors for a layered look. Use a knife or toothpick to gently swirl the colors together for a marbled effect, avoid overmixing.
- Chill and Garnish: Refrigerate the pie for at least 2 hours, or until fully set. Before serving, top with whipped cream and decorate with festive Easter sprinkles.
- Serve: Slice and serve chilled. Enjoy this creamy, colorful, and cheerful springtime dessert!
Notes
- For a more dramatic swirl, use a spoon to dollop large spoonfuls of each color into the crust before swirling lightly with a skewer.
- You can also freeze the pie for 30 minutes before serving for a firmer texture.
- Prep Time: 20 minutes
- Cook Time: 0 minutes
- Category: Dessert
- Method: No-Bake
- Cuisine: American
Nutrition
- Serving Size: 1 slice
- Calories: 400
- Sugar: 32g
- Sodium: 180mg
- Fat: 25g
- Saturated Fat: 14g
- Unsaturated Fat: 9g
- Trans Fat: 0g
- Carbohydrates: 40g
- Fiber: 0g
- Protein: 4g
- Cholesterol: 55mg
Keywords: Easter dessert, no-bake pie, pastel pie, spring recipes, cream cheese pie